

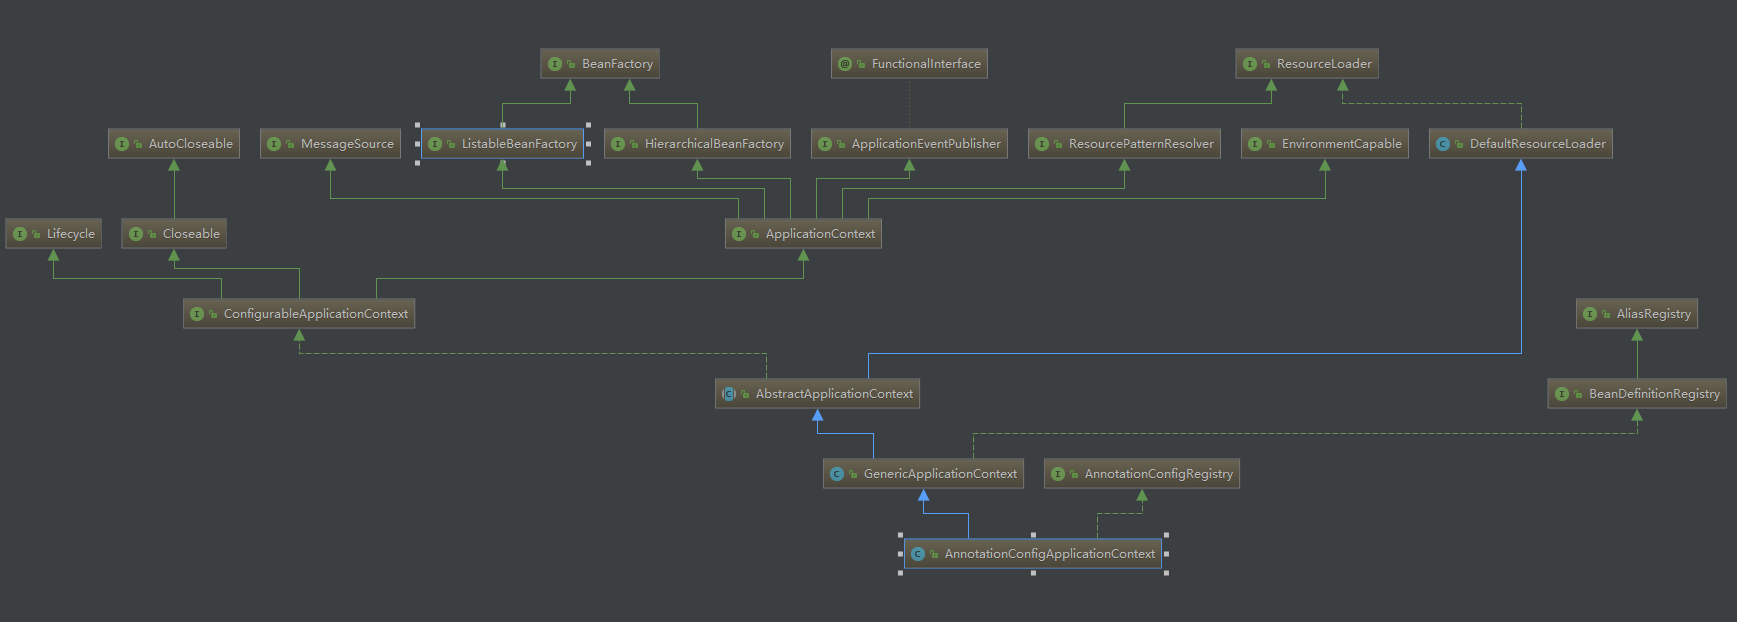
AnnotationConfigApplicationContext
启动类
public class ConfigStart {
    public static void main(String[] args) {
        ApplicationContext applicationContext = new AnnotationConfigApplicationContext(MainConfig.class);
        Student student = applicationContext.getBean(Student.class);
    }
}
主配置类
@Configuration
public class MainConfig {
    @Bean
    public Student student() {
        return new Student();
    }
}
bean
@Data
@NoArgsConstructor
@AllArgsConstructor
public class Student {
    /**
     * id
     */
    private Long id;

    /**
     * name
     */
    private String name;
}
结构图
AnnotationConfigApplicationContext构造器
public AnnotationConfigApplicationContext(Class<?>... componentClasses) {
   this();
   register(componentClasses);
   refresh();
}
AnnotationConfigApplicationContext#this()方法解析
public AnnotationConfigApplicationContext() {
    	// 初始化
    	// 1.传入的 this==AnnotationConfigApplicationContext 对象
    	// 2.AnnotatedBeanDefinitionReader对象有属性BeanDefinitionRegistry【BeanDefinition注册器】, 指向AnnotationConfigApplicationContext对象
    	// 3.同时创建Environment对象, 实现是StandardEnvironment对象, 赋给AbstractApplicationContext对象
    	// 4.调用AnnotationConfigApplicationContext直接父类GenericApplicationContext的构造器方法,初始化beanFactory对象DefaultListableBeanFactory
    	// 5.调用AnnotationConfigUtils.registerAnnotationConfigProcessors(this.registry)方法
    	// 6.【重要: AnnotatedBeanDefinitionReader的作用】
		this.reader = new AnnotatedBeanDefinitionReader(this);
    	// ClassPathBeanDefinitionScanner 这个类比较重要, 我们在spring整合mybatis中, 自定义扫描器就继承了这个扫描器!!!
		this.scanner = new ClassPathBeanDefinitionScanner(this);
	}
AnnotationConfigUtils#registerAnnotationConfigProcessors(this.registry) 方法解析
public static void registerAnnotationConfigProcessors(BeanDefinitionRegistry registry) {
    // 调用registerAnnotationConfigProcessors(registry, null)
    registerAnnotationConfigProcessors(registry, null);
}
public static Set<BeanDefinitionHolder> registerAnnotationConfigProcessors(
			BeanDefinitionRegistry registry, @Nullable Object source) {
	// 1.从AnnotationConfigApplicationContext中获取beanFactory,内部是通过AnnotationConfigApplicationContext的直接父类GenericApplicationContext中获取beanFacory,这个在之前调用public AnnotationConfigApplicationContext(){...}构造器时,调用其父类GenericApplicationContext的构造器的时候,已经初始化了
    DefaultListableBeanFactory beanFactory = unwrapDefaultListableBeanFactory(registry);
    if (beanFactory != null) {
        // 赋值beanFactory的dependencyComparator为AnnotationAwareOrderComparator【单例】
        if (!(beanFactory.getDependencyComparator() instanceof AnnotationAwareOrderComparator)) {
            beanFactory.setDependencyComparator(AnnotationAwareOrderComparator.INSTANCE);
        }
        // 赋值beanFactory的autowireCandidateResolver为ContextAnnotationAutowireCandidateResolver
        if (!(beanFactory.getAutowireCandidateResolver() instanceof ContextAnnotationAutowireCandidateResolver)) {
            beanFactory.setAutowireCandidateResolver(new ContextAnnotationAutowireCandidateResolver());
        }
    }

    Set<BeanDefinitionHolder> beanDefs = new LinkedHashSet<>(8);
	// beanFactory中的成员变量beanDefinitionMap, key为类的全限定名, value为BeanDefinition对象
    // 总结: 是对ConfigurationClassPostProcessor的处理
    // 【ConfigurationClassPostProcessor】非常重要: 实现了BeanDefinitionRegistryPostProcessor接口, BeanDefinitionRegistryPostProcessor是BeanFactoryPostProcessor的子接口
    // 1.向beanDefinitionMap中注册(internalConfigurationAnnotationProcessor, ConfigurationClassPostProcessor对应的BeanDefinition)
    // 2.beanDefinitionNames中添加internalConfigurationAnnotationProcessor
    // 3.beanDefs中添加BeanDefinitionHolder
    if (!registry.containsBeanDefinition(CONFIGURATION_ANNOTATION_PROCESSOR_BEAN_NAME)) {
        // 没有internalConfigurationAnnotationProcessor的BeanDefinition对象
        // 创建RootBeanDefinition对象, 是对ConfigurationClassPostProcessor Class对象的封装
        RootBeanDefinition def = new RootBeanDefinition(ConfigurationClassPostProcessor.class);
        def.setSource(source);
        /**
         * registy: AnnotationConfigApplicationContext对象
         * def: BeanDefinition对象
         * CONFIGURATION_ANNOTATION_PROCESSOR_BEAN_NAME:internalConfigurationAnnotationProcessor
         */
        // registerPostProcessor(...)方法解析:
        // 1.内部调用registry.registerBeanDefinition(beanName, definition)
        // 2.判断 beanDefinitionMap 中没有key==internalConfigurationAnnotationProcessor
        // 3.将(internalConfigurationAnnotationProcessor, RootBeanDefinition def) 放入 beanDefinitionMap!
        // 4.将beanDefinitionNames添加internalConfigurationAnnotationProcessor
        // 创建BeanDefinitionHolder对象添加到 beanDefs
        beanDefs.add(registerPostProcessor(registry, def, CONFIGURATION_ANNOTATION_PROCESSOR_BEAN_NAME));
    }

    // 跟上面的方法类似
    // 总结: 是对AutowiredAnnotationBeanPostProcessor的处理
    // 1.向beanDefinitionMap中注册(internalAutowiredAnnotationProcessor, AutowiredAnnotationBeanPostProcessor对应的BeanDefinition)
    // 2.beanDefinitionNames中添加internalAutowiredAnnotationProcessor
    // 3.beanDefs中添加BeanDefinitionHolder
    if (!registry.containsBeanDefinition(AUTOWIRED_ANNOTATION_PROCESSOR_BEAN_NAME)) {
        RootBeanDefinition def = new RootBeanDefinition(AutowiredAnnotationBeanPostProcessor.class);
        def.setSource(source);
        beanDefs.add(registerPostProcessor(registry, def, AUTOWIRED_ANNOTATION_PROCESSOR_BEAN_NAME));
    }
	// 跟上面的方法类似
    // 总结: 是对CommonAnnotationBeanPostProcessor的处理
    // 1.向beanDefinitionMap中注册(internalCommonAnnotationProcessor, CommonAnnotationBeanPostProcessor对应的BeanDefinition)
    // 2.beanDefinitionNames中添加internalCommonAnnotationProcessor
    // 3.beanDefs中添加BeanDefinitionHolder
    if (jsr250Present && !registry.containsBeanDefinition(COMMON_ANNOTATION_PROCESSOR_BEAN_NAME)) {
        RootBeanDefinition def = new RootBeanDefinition(CommonAnnotationBeanPostProcessor.class);
        def.setSource(source);
        beanDefs.add(registerPostProcessor(registry, def, COMMON_ANNOTATION_PROCESSOR_BEAN_NAME));
    }

    // jpaPresent:false 不会执行
    if (jpaPresent && !registry.containsBeanDefinition(PERSISTENCE_ANNOTATION_PROCESSOR_BEAN_NAME)) {
        RootBeanDefinition def = new RootBeanDefinition();
        try {
            def.setBeanClass(ClassUtils.forName(PERSISTENCE_ANNOTATION_PROCESSOR_CLASS_NAME,
                                                AnnotationConfigUtils.class.getClassLoader()));
        }
        catch (ClassNotFoundException ex) {
            throw new IllegalStateException(
                "Cannot load optional framework class: " + PERSISTENCE_ANNOTATION_PROCESSOR_CLASS_NAME, ex);
        }
        def.setSource(source);
        beanDefs.add(registerPostProcessor(registry, def, PERSISTENCE_ANNOTATION_PROCESSOR_BEAN_NAME));
    }

    // 跟上面的方法类似
    // 总结: 是对EventListenerMethodProcessor的处理
    // 1.向beanDefinitionMap中注册(internalEventListenerProcessor, EventListenerMethodProcessor对应的BeanDefinition)
    // 2.beanDefinitionNames中添加internalEventListenerProcessor
    // 3.beanDefs中添加BeanDefinitionHolder
    if (!registry.containsBeanDefinition(EVENT_LISTENER_PROCESSOR_BEAN_NAME)) {
        RootBeanDefinition def = new RootBeanDefinition(EventListenerMethodProcessor.class);
        def.setSource(source);
        beanDefs.add(registerPostProcessor(registry, def, EVENT_LISTENER_PROCESSOR_BEAN_NAME));
    }

    // 跟上面的方法类似
    // 总结: 是对DefaultEventListenerFactory的处理
    // 1.向beanDefinitionMap中注册(internalEventListenerFactory, DefaultEventListenerFactory对应的BeanDefinition)
    // 2.beanDefinitionNames中添加internalEventListenerFactory
    // 3.beanDefs中添加BeanDefinitionHolder
    if (!registry.containsBeanDefinition(EVENT_LISTENER_FACTORY_BEAN_NAME)) {
        RootBeanDefinition def = new RootBeanDefinition(DefaultEventListenerFactory.class);
        def.setSource(source);
        beanDefs.add(registerPostProcessor(registry, def, EVENT_LISTENER_FACTORY_BEAN_NAME));
    }

    return beanDefs;
}
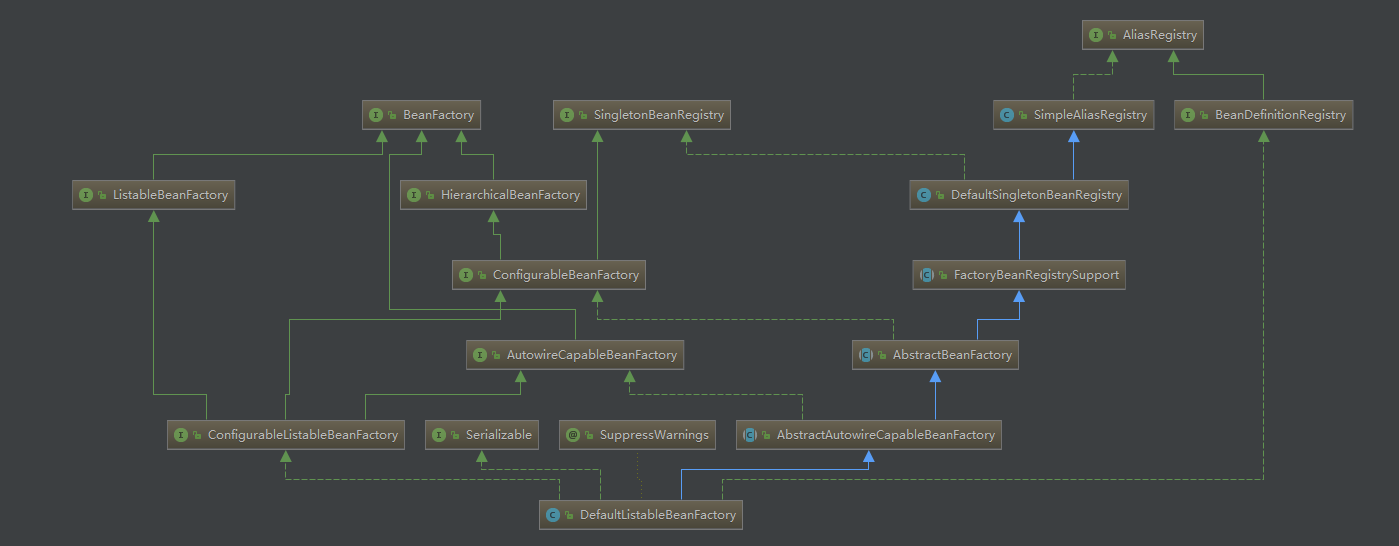
DefaultListableBeanFactory结构图
总结
1.创建AnnotatedBeanDefinitionReader对象,用于解析注解类BeanDefinition,同时AnnotatedBeanDefinitionReader对象有一个成员:
BeanDefinitionRegistry,赋值为AnnotationConfigApplicationContext对象(AnnotationConfigApplicationContext和AnnotatedBeanDefinitionReader相互引用)
2.AbstractApplicationContext对象有Environment成员,会初始化为StandardEnvironment对象。
AbstractApplicationContext是AnnotationConfigApplicationContext父类的父类
3.GenericApplicationContext对象有DefaultListableBeanFactory成员,会初始化为DefaultListableBeanFactory, 该对象是真正的beanFactory。【非常重要】
GenericApplicationContext是AnnotationConfigApplicationContext的父类
4.beanFactory, 类型为DefaultListableBeanFactory, 有几个重要的成员变量:
private final Map<String, BeanDefinition> beanDefinitionMap = new ConcurrentHashMap<>(256);//key-类的全限定名 value-BeanDefinition
private volatile List<String> beanDefinitionNames = new ArrayList<>(256);// 存储类的全限定名
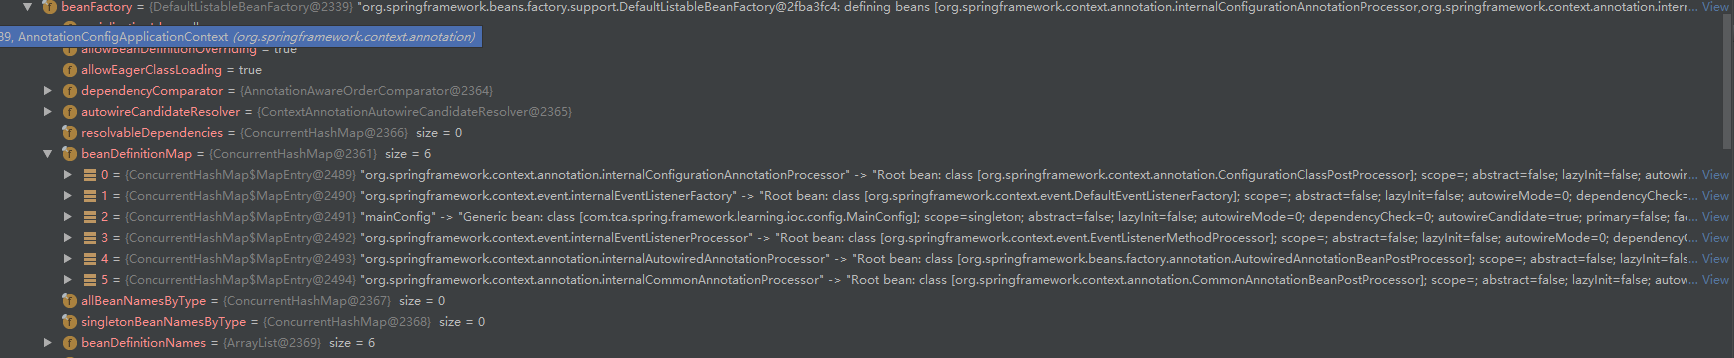
初始化的时候,会先后在beanDefinitionMap中添加:
(internalConfigurationAnnotationProcessor, ConfigurationClassPostProcessor对应的BeanDefinition)
(internalAutowiredAnnotationProcessor, AutowiredAnnotationBeanPostProcessor对应的BeanDefinition)
(internalCommonAnnotationProcessor, CommonAnnotationBeanPostProcessor对应的BeanDefinition)
(internalEventListenerProcessor, EventListenerMethodProcessor对应的BeanDefinition)
(internalEventListenerFactory, DefaultEventListenerFactory对应的BeanDefinition)
在beanDefinitionNames中添加:
internalConfigurationAnnotationProcessor, internalAutowiredAnnotationProcessor, internalCommonAnnotationProcessor,
internalEventListenerProcessor, internalEventListenerFactory
以上注册的5个BeanDefinition非常非常重要!!!!!!
5.创建ClassPathBeanDefinitionScanner对象
AnnotationConfigApplicationContext#register(componentClasses)方法解析
public void register(Class<?>... componentClasses) {
    Assert.notEmpty(componentClasses, "At least one component class must be specified");
    // 调用reader的register方法, reader为AnnotatedBeanDefinitionReader, 内部是调用doRegisterBean(beanClass, null, null, null)
    this.reader.register(componentClasses);
}

public void registerBean(Class<?> beanClass) {
    doRegisterBean(beanClass, null, null, null);
}
AnnotatedBeanDefinitionReader#doRegisterBean(...) 方法解析
<T> void doRegisterBean(Class<T> beanClass, @Nullable Supplier<T> instanceSupplier, @Nullable String name,
                        @Nullable Class<? extends Annotation>[] qualifiers, BeanDefinitionCustomizer... definitionCustomizers) {
	// 1.根据配置类创建AnnotatedGenericBeanDefinition注解通用BeanDefinition对象
    AnnotatedGenericBeanDefinition abd = new AnnotatedGenericBeanDefinition(beanClass);
    // 2.判断需不需要跳过注册,Spring中有一个@Condition注解,如果不满足条件,就会跳过这个类的注册
    // 此处为false, 不能跳过注册
    if (this.conditionEvaluator.shouldSkip(abd.getMetadata())) {
        return;
    }
    abd.setInstanceSupplier(instanceSupplier);
    // 3.解析scope注解, 默认是singleton, 单例
    ScopeMetadata scopeMetadata = this.scopeMetadataResolver.resolveScopeMetadata(abd);
    abd.setScope(scopeMetadata.getScopeName());// singleton
    String beanName = (name != null ? name : this.beanNameGenerator.generateBeanName(abd, this.registry)); // mainConfig
	// 4.解析通用注解 @Lazy @Primary @DependsOn @Role @Description 这些注解都会解析为AnnotatedGenericBeanDefinition中的属性
    AnnotationConfigUtils.processCommonDefinitionAnnotations(abd);
    if (qualifiers != null) {
        for (Class<? extends Annotation> qualifier : qualifiers) {
            if (Primary.class == qualifier) {
                abd.setPrimary(true);
            }
            else if (Lazy.class == qualifier) {
                abd.setLazyInit(true);
            }
            else {
                abd.addQualifier(new AutowireCandidateQualifier(qualifier));
            }
        }
    }
    for (BeanDefinitionCustomizer customizer : definitionCustomizers) {
        customizer.customize(abd);
    }
	// 5.创建BeanDefinitionHolder对象
    BeanDefinitionHolder definitionHolder = new BeanDefinitionHolder(abd, beanName);
    // 6.applyScopedProxyMode是否采用代理模式, 默认不采用
    definitionHolder = AnnotationConfigUtils.applyScopedProxyMode(scopeMetadata, definitionHolder, this.registry);
    // 7.注册BeanDefinition【常用方法】
    // 向beanDefinitionMap中注册(mainConfig, MainConfig对应的BeanDefinition)
    // 向beanDefinitionNames中添加mainConfig
    BeanDefinitionReaderUtils.registerBeanDefinition(definitionHolder, this.registry);
}
此时,一共注册了6个BeanDefinition,其中5个内置的RootBeanDefinition,一个注解式的AnnotatedGenericBeanDefinition
总结
1.解析主配置类MainConfig
2.创建MainConfig对应的BeanDefinition对象AnnotatedGenericBeanDefinition
3.解析@Scope注解
4.解析通用注解 @Lazy @Primary @DependsOn @Role @Description, 如果有加对应的注解, 会配置AnnotatedGenericBeanDefinition的对应属性
5.向beanDefinitionMap中注册(mainConfig, MainConfig对应的BeanDefinition), 向beanDefinitionNames中添加mainConfig
AbstractApplicationContext#refresh()
refresh()方法调用的是AnnotationConfigApplicationContext父类的父类AbstractApplicationContext的refresh()方法
public void refresh() throws BeansException, IllegalStateException {
    synchronized (this.startupShutdownMonitor) {
        // Prepare this context for refreshing.
        prepareRefresh();
        // Tell the subclass to refresh the internal bean factory.
        ConfigurableListableBeanFactory beanFactory = obtainFreshBeanFactory();
        // Prepare the bean factory for use in this context.
        prepareBeanFactory(beanFactory);
        try {
            // Allows post-processing of the bean factory in context subclasses.
            postProcessBeanFactory(beanFactory);
            // Invoke factory processors registered as beans in the context.
            invokeBeanFactoryPostProcessors(beanFactory);
            // Register bean processors that intercept bean creation.
            registerBeanPostProcessors(beanFactory);
            // Initialize message source for this context.
            initMessageSource();
            // Initialize event multicaster for this context.
            initApplicationEventMulticaster();
            // Initialize other special beans in specific context subclasses.
            onRefresh();
            // Check for listener beans and register them.
            registerListeners();
            // Instantiate all remaining (non-lazy-init) singletons.
            finishBeanFactoryInitialization(beanFactory);
            // Last step: publish corresponding event.
            finishRefresh();
        }
        catch (BeansException ex) {
            if (logger.isWarnEnabled()) {
                logger.warn("Exception encountered during context initialization - " +
                            "cancelling refresh attempt: " + ex);
            }
            // Destroy already created singletons to avoid dangling resources.
            destroyBeans();
            // Reset 'active' flag.
            cancelRefresh(ex);
            // Propagate exception to caller.
            throw ex;
        }
        finally {
            // Reset common introspection caches in Spring's core, since we
            // might not ever need metadata for singleton beans anymore...
            resetCommonCaches();
        }
    }
}
1. AbstractApplicationContext#prepareRefresh()
protected void prepareRefresh() {
    // 设置启动时间, closed, active标识
    this.startupDate = System.currentTimeMillis();
    this.closed.set(false);
    this.active.set(true);
    // 日志
    if (logger.isDebugEnabled()) {
        if (logger.isTraceEnabled()) {
            logger.trace("Refreshing " + this);
        }
        else {
            logger.debug("Refreshing " + getDisplayName());
        }
    }
    // 空实现, 初始化placeholder property sources
    initPropertySources();
    // 校验Environment中必须的属性, 目前为空, Environment在构造器方法中已经初始化完毕, StandardEnvironment, 被AbstractApplicationContext所持有
    getEnvironment().validateRequiredProperties();
    // 初始化earlyApplicationListeners
    if (this.earlyApplicationListeners == null) {
        this.earlyApplicationListeners = new LinkedHashSet<>(this.applicationListeners);
    }
    else {
        this.applicationListeners.clear();
        this.applicationListeners.addAll(this.earlyApplicationListeners);
    }
    // 初始化earlyApplicationEvents
    this.earlyApplicationEvents = new LinkedHashSet<>();
}
总结
设置了 启动时间, closed, active标识, 初始化了AbstractApplicationContext的两个成员变量:
private Set<ApplicationListener<?>> earlyApplicationListeners = new LinkedHashSet<>();
private Set<ApplicationEvent> earlyApplicationEvents = new LinkedHashSet<>();
2. AbstractApplicationContext#obtainFreshBeanFactory()
protected ConfigurableListableBeanFactory obtainFreshBeanFactory() {
    // 1.调用GenericApplicationContext的refreshBeanFactory()方法
    // 2.修改GenericApplicationContext对象里的 refreshed 标识改为true
    // 3.设置beanFactory(实际类型为类型为DefaultListableBeanFactory)对象的serializationId
    refreshBeanFactory();
    // 4.返回beanFactory
    return getBeanFactory();
}
总结
修改GenericApplicationContext对象里的 refreshed 标识改为true, 设置id, 返回beanFactory对象【DefaultListableBeanFactory】
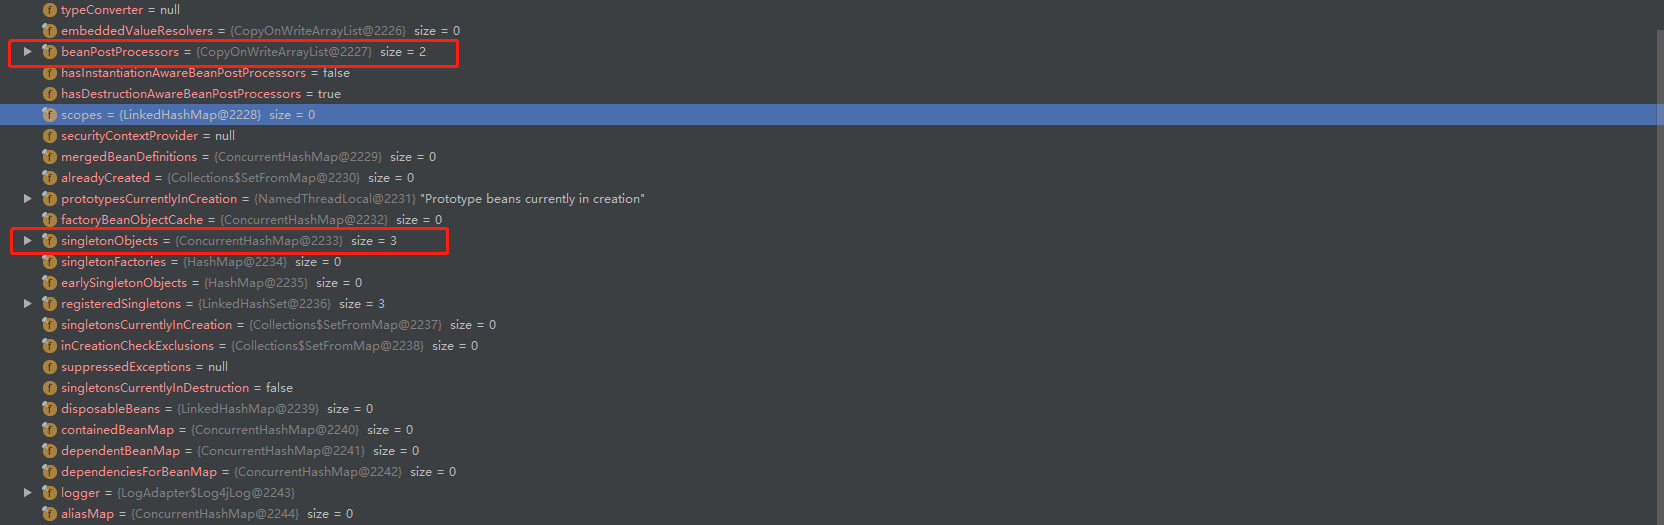
3. AbstractApplicationContext#prepareBeanFactory(beanFactory)
protected void prepareBeanFactory(ConfigurableListableBeanFactory beanFactory) {
    // 1.设置类加载器 - 系统类加载器AppClassLoader
    beanFactory.setBeanClassLoader(getClassLoader());
    // 2.设置spring el表达式解析器 - StandardBeanExpressionResolver
    beanFactory.setBeanExpressionResolver(new StandardBeanExpressionResolver(beanFactory.getBeanClassLoader()));
    // 3.添加属性编辑器
    beanFactory.addPropertyEditorRegistrar(new ResourceEditorRegistrar(this, getEnvironment()));

    // 4.添加了一个后置处理器 ApplicationContextAwareProcessor, 实现了BeanPostProcessor接口, 将其添加到了AbstractBeanFactory对象的beanPostProcessors列表中
    // beanFactory的一个父类 AbstractBeanFactory,有一个属性:
    // private final List<BeanPostProcessor> beanPostProcessors = new CopyOnWriteArrayList<>() // 用于存放所有的后置处理器
    beanFactory.addBeanPostProcessor(new ApplicationContextAwareProcessor(this));
    // 5. beanFactory的一个父类 AbstractAutowireCapableBeanFactory, 有一个属性:
    //  private final Set<Class<?>> ignoredDependencyInterfaces = new HashSet<>() // 用于存放【忽略自动装配】的接口
    // 当前对象初始化完成后, ignoredDependencyInterfaces会存放三个接口: BeanFactoryAware、BeanClassLoaderAware、BeanNameAware
    // 此时又添加了6个接口: EnvironmentAware、EmbeddedValueResolverAware、ResourceLoaderAware、ApplicationEventPublisherAware、
    // MessageSourceAware、ApplicationContextAware, 一共有9个忽略自动装配的接口
    beanFactory.ignoreDependencyInterface(EnvironmentAware.class);
    beanFactory.ignoreDependencyInterface(EmbeddedValueResolverAware.class);
    beanFactory.ignoreDependencyInterface(ResourceLoaderAware.class);
    beanFactory.ignoreDependencyInterface(ApplicationEventPublisherAware.class);
    beanFactory.ignoreDependencyInterface(MessageSourceAware.class);
    beanFactory.ignoreDependencyInterface(ApplicationContextAware.class);
	// 6. beanFactory有一个属性:
    // private final Map<Class<?>, Object> resolvableDependencies = new ConcurrentHashMap<>(16); // 用于存放允许自动装配的bean
    // key - 类的Class对象, value - 具体的实例对象, this - AnnotationConfigApplicationContext
    beanFactory.registerResolvableDependency(BeanFactory.class, beanFactory);
    beanFactory.registerResolvableDependency(ResourceLoader.class, this);
    beanFactory.registerResolvableDependency(ApplicationEventPublisher.class, this);
    beanFactory.registerResolvableDependency(ApplicationContext.class, this);
	// 7.添加了一个后置处理器 ApplicationListenerDetector, 实现了BeanPostProcessor接口, 将其添加到了AbstractBeanFactory对象的beanPostProcessors列表中, 现在beanPostProcessors里有两个成员: ApplicationContextAwareProcessor, ApplicationListenerDetector
    // 同时 ApplicationListenerDetector 实现了 DestructionAwareBeanPostProcessor接口, AbstractBeanFactory的hasDestructionAwareBeanPostProcessors属性置为 true
    beanFactory.addBeanPostProcessor(new ApplicationListenerDetector(this));
    // 8.判断beanFactory是否有 loadTimeWeaver 对象, 如果没有, 会判断beanFactory的父容器中有没有包含当前对象, 如果没有, 返回false
    // 当前beanFactory没有loadTimeWeaver, 且beanFactory的父容器为空, 此处返回false
    if (beanFactory.containsBean(LOAD_TIME_WEAVER_BEAN_NAME)) {
        beanFactory.addBeanPostProcessor(new LoadTimeWeaverAwareProcessor(beanFactory));
        beanFactory.setTempClassLoader(new ContextTypeMatchClassLoader(beanFactory.getBeanClassLoader()));
    }
	/*
	 * 解析重点方法:
	 *	beanFactory.containsLocalBean(beanName) {
	 *      String beanName = transformedBeanName(name);
	 *	    return ((containsSingleton(beanName) || containsBeanDefinition(beanName)) &&
	 *			(!BeanFactoryUtils.isFactoryDereference(name) || isFactoryBean(beanName)));
	 *  }
	 *  spring的三级缓存, 存储在beanFactory的父类对象 DefaultSingletonBeanRegistry, 分别是:
	 *    private final Map<String, Object> singletonObjects = new ConcurrentHashMap<>(256); // 一级缓存
	 *    private final Map<String, Object> earlySingletonObjects = new HashMap<>(16); // 二级缓存
	 *    private final Map<String, ObjectFactory<?>> singletonFactories = new HashMap<>(16); // 三级缓存
	 *    private final Set<String> registeredSingletons = new LinkedHashSet<>(256); // 已经注册了的bean列表
	 *  containsSingleton(beanName): 判断一级缓存中有没有
	 *  containsBeanDefinition(beanName): 判断beanFactory的beanDefinitionMap有没有
	 */
    if (!beanFactory.containsLocalBean(ENVIRONMENT_BEAN_NAME)) {
        // 注册单例
        // 放入一级缓存中: (environment, StandardEnvironment)
        // 从二级缓存和三级缓存中移除
        // 放入已注册的bean列表
        beanFactory.registerSingleton(ENVIRONMENT_BEAN_NAME, getEnvironment());
    }
    if (!beanFactory.containsLocalBean(SYSTEM_PROPERTIES_BEAN_NAME)) {
        // 注册单例
        // 放入一级缓存中: (systemProperties, Map<String, Object>)
        // 放入已注册bean列表
        beanFactory.registerSingleton(SYSTEM_PROPERTIES_BEAN_NAME, getEnvironment().getSystemProperties());
    }
    if (!beanFactory.containsLocalBean(SYSTEM_ENVIRONMENT_BEAN_NAME)) {
        // 注册单例
        // 放入一级缓存中: (systemEnvironment, Map<String, Object>)
        // 放入已注册bean列表
        beanFactory.registerSingleton(SYSTEM_ENVIRONMENT_BEAN_NAME, getEnvironment().getSystemEnvironment());
    }
}
总结
1.设置类加载器为AppClassLoader
2.设置spring el表达式解析器 - StandardBeanExpressionResolver
3.添加属性编辑器 - ResourceEditorRegistrar
4.添加两个后置处理器: ApplicationContextAwareProcessor, ApplicationListenerDetector
5.ignoredDependencyInterfaces中注册 6个忽略自动装配的接口, 一共9个
6.resolvableDependencies中注册 4个允许自动装配的bean
7.beanFactory中注册三个实例对象: environment, systemProperties, systemEnvironment, 放入一级缓存map和已注册bean列表中
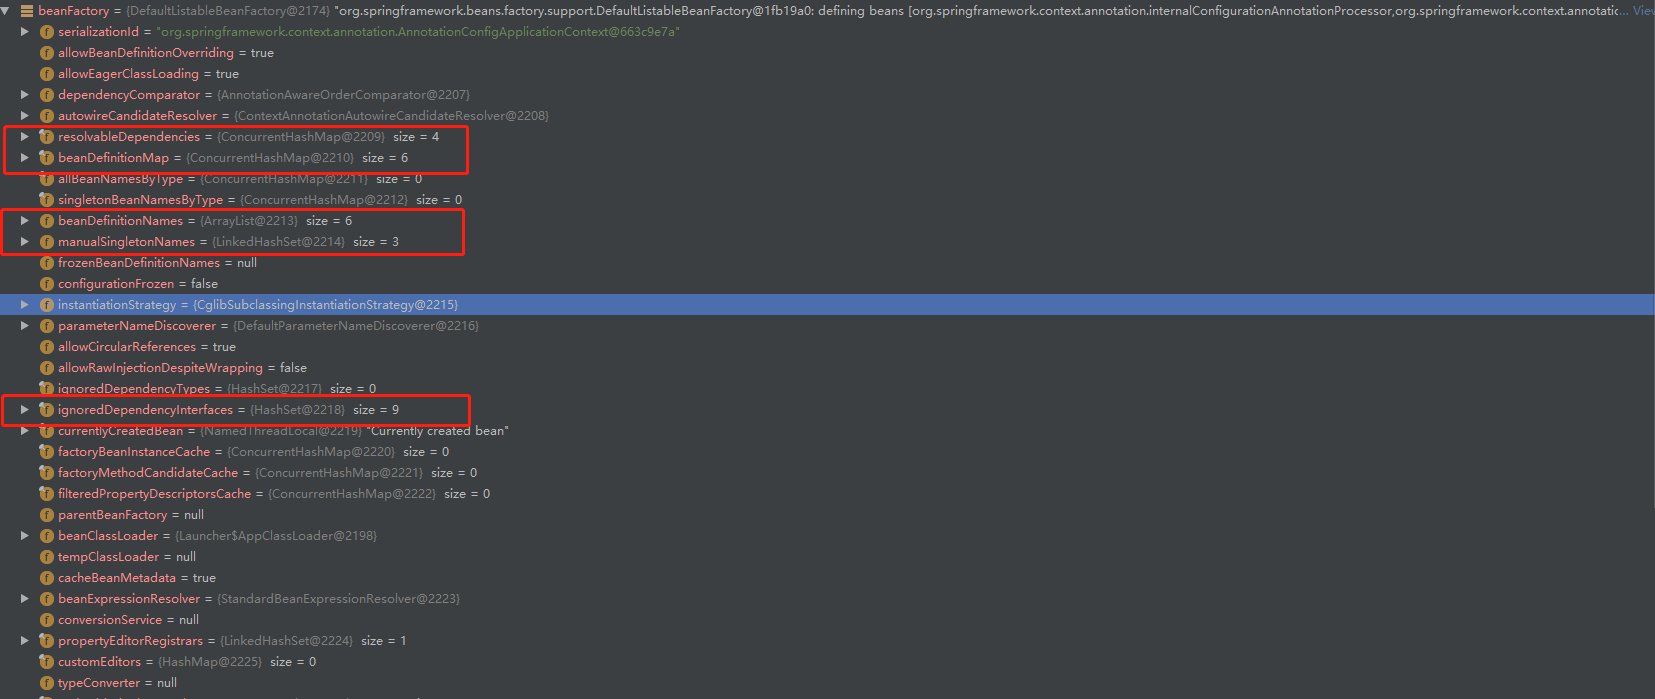
此时的beanFactory
4. AbstractApplicationContext#postProcessBeanFactory(beanFactory)
空实现,子类扩展
5.AbstractApplicationContext#invokeBeanFactoryPostProcessors(beanFactory)
protected void invokeBeanFactoryPostProcessors(ConfigurableListableBeanFactory beanFactory) {
    // getBeanFactoryPostProcessors拿到的beanFactoryPostProcessors一直是空的
    PostProcessorRegistrationDelegate.invokeBeanFactoryPostProcessors(beanFactory, getBeanFactoryPostProcessors());
	// 这里为false, 跳过
    if (beanFactory.getTempClassLoader() == null && beanFactory.containsBean(LOAD_TIME_WEAVER_BEAN_NAME)) {
        beanFactory.addBeanPostProcessor(new LoadTimeWeaverAwareProcessor(beanFactory));
        beanFactory.setTempClassLoader(new ContextTypeMatchClassLoader(beanFactory.getBeanClassLoader()));
    }
}
5. 1 PostProcessorRegistrationDelegate#invokeBeanFactoryPostProcessors(beanFactory, getBeanFactoryPostProcessors()) 解析 【重点方法】
public static void invokeBeanFactoryPostProcessors(
    ConfigurableListableBeanFactory beanFactory, List<BeanFactoryPostProcessor> beanFactoryPostProcessors) {

    // 用来存储已经执行完了的BeanFactoryPostProcessor
    Set<String> processedBeans = new HashSet<>();

    if (beanFactory instanceof BeanDefinitionRegistry) {
        BeanDefinitionRegistry registry = (BeanDefinitionRegistry) beanFactory;
        // 1.regularPostProcessors 用来存放普通BeanFactoryPostProcessor
        List<BeanFactoryPostProcessor> regularPostProcessors = new ArrayList<>();
        // 2.registryProcessors 用来存放BeanDefinitionRegistryPostProcessor, BeanDefinitionRegistryPostProcessor是BeanFactoryPostProcessor的子接口
        List<BeanDefinitionRegistryPostProcessor> registryProcessors = new ArrayList<>();
		// 3.beanFactoryPostProcessors是空的, 所以此处不会执行
        // 【注意:】我们如果在主配置里向容器注册了自定义的BeanFactoryPostProcessors, 这里的beanFactoryPostProcessors也是空的!!!因为, 还没有开始解析主配置类
        for (BeanFactoryPostProcessor postProcessor : beanFactoryPostProcessors) {
            if (postProcessor instanceof BeanDefinitionRegistryPostProcessor) {
                BeanDefinitionRegistryPostProcessor registryProcessor =
                    (BeanDefinitionRegistryPostProcessor) postProcessor;
                registryProcessor.postProcessBeanDefinitionRegistry(registry);
                registryProcessors.add(registryProcessor);
            }
            else {
                regularPostProcessors.add(postProcessor);
            }
        }

        // Do not initialize FactoryBeans here: We need to leave all regular beans
        // uninitialized to let the bean factory post-processors apply to them!
        // Separate between BeanDefinitionRegistryPostProcessors that implement
        // PriorityOrdered, Ordered, and the rest.
        // 翻译: 在这里不会初始化普通的bean对象, 让它们处于未初始化的状态,  我们需要先让bean factory post processors来处理它们, 其次, 需要分离出来 PriorityOrdered(实现优先级顺序的), Ordered(普通顺序的)和一般的BeanDefinitionRegistryPostProcessors
        // 临时列表
        List<BeanDefinitionRegistryPostProcessor> currentRegistryProcessors = new ArrayList<>();

        // First, invoke the BeanDefinitionRegistryPostProcessors that implement PriorityOrdered.
        // 翻译: 先处理实现PriorityOrdered接口的BeanDefinitionRegistryPostProcessors
        // 4.获取BeanDefinitionRegistryPostProcessor的实现类的名称, 从beanDefinitionNames中获取的, 结果为:internalConfigurationAnnotationProcessor, 对应的BeanDefinition为:ConfigurationClassPostProcessor对应的BeanDefinition
        String[] postProcessorNames =
            beanFactory.getBeanNamesForType(BeanDefinitionRegistryPostProcessor.class, true, false);
        for (String ppName : postProcessorNames) {
            // 5.internalConfigurationAnnotationProcessor, 对应的BeanDefinition:ConfigurationClassPostProcessor实现了PriorityOrdered接口
            // 这里为: true
            if (beanFactory.isTypeMatch(ppName, PriorityOrdered.class)) {
                // 6. 获得ConfigurationClassPostProcessor类,并且放到currentRegistryProcessors
                // ConfigurationClassPostProcessor是很重要的一个类,它实现了BeanDefinitionRegistryPostProcessor接口, BeanFactoryPostProcessor接口
                // ConfigurationClassPostProcessor是极其重要的类, 里面执行了扫描Bean,Import,ImportResouce等各种操作
                // 用来处理配置类(有两种情况 一种是传统意义上的配置类,一种是普通的bean)的各种逻辑
                // beanFactory.getBean()方法也极其重要, 这里创建了ConfigurationClassPostProcessor对象
                // 此时, currentRegistryProcessors中包含了ConfigurationClassPostProcessor
                // 【重要:这里会创建并初始化ConfigurationClassPostProcessor对象, 并放入到一级缓存中!!!】beanFactory.getBean(ppName, BeanDefinitionRegistryPostProcessor.class)这个方法会在后面解析, 这个是创建bean的核心方法
                currentRegistryProcessors.add(beanFactory.getBean(ppName, BeanDefinitionRegistryPostProcessor.class));
                // 把name放到processedBeans,后续会根据这个集合来判断处理器是否已经被执行过了
                processedBeans.add(ppName);
            }
        }
        // 7.处理排序
        sortPostProcessors(currentRegistryProcessors, beanFactory);
        // 8.合并Processors,为什么要合并,因为registryProcessors是装载BeanDefinitionRegistryPostProcessor的
        // 一开始的时候,spring只会执行BeanDefinitionRegistryPostProcessor独有的方法
        // 而不会执行BeanDefinitionRegistryPostProcessor父类的方法,即BeanFactoryProcessor的方法
        // 所以这里需要把处理器放入一个集合中,后续统一执行父类的方法
        // 这里目前还只有一个 ConfigurationClassPostProcessor
        registryProcessors.addAll(currentRegistryProcessors);
        // 9.这里调用所有实现PriorityOrdered接口的BeanDefinitionRegistryPostProcessors的postProcessBeanDefinitionRegistry()方法
        // 目前只有一个内置的实现PriorityOrdered接口的BeanDefinitionRegistryPostProcessor:【ConfigurationClassPostProcessor】
        invokeBeanDefinitionRegistryPostProcessors(currentRegistryProcessors, registry);
        currentRegistryProcessors.clear();
        // 10.跟上述过程一样, 这里处理实现Ordered的接口
        postProcessorNames = beanFactory.getBeanNamesForType(BeanDefinitionRegistryPostProcessor.class, true, false);
        for (String ppName : postProcessorNames) {
            if (!processedBeans.contains(ppName) && beanFactory.isTypeMatch(ppName, Ordered.class)) {
                currentRegistryProcessors.add(beanFactory.getBean(ppName, BeanDefinitionRegistryPostProcessor.class));
                processedBeans.add(ppName);
            }
        }
        sortPostProcessors(currentRegistryProcessors, beanFactory);
        registryProcessors.addAll(currentRegistryProcessors);
        invokeBeanDefinitionRegistryPostProcessors(currentRegistryProcessors, registry);
        currentRegistryProcessors.clear();

        // 11.跟上述过程一样, 处理未实现PriorityOrdered和Ordered接口的普通的 BeanDefinitionRegistryPostProcessor
        // 这里没有, 直接跳过
        boolean reiterate = true;
        while (reiterate) {
            reiterate = false;
            postProcessorNames = beanFactory.getBeanNamesForType(BeanDefinitionRegistryPostProcessor.class, true, false);
            for (String ppName : postProcessorNames) {
                if (!processedBeans.contains(ppName)) {
                    currentRegistryProcessors.add(beanFactory.getBean(ppName, BeanDefinitionRegistryPostProcessor.class));
                    processedBeans.add(ppName);
                    reiterate = true;
                }
            }
            sortPostProcessors(currentRegistryProcessors, beanFactory);
            registryProcessors.addAll(currentRegistryProcessors);
            invokeBeanDefinitionRegistryPostProcessors(currentRegistryProcessors, registry);
            currentRegistryProcessors.clear();
        }
        // registryProcessors集合装载BeanDefinitionRegistryPostProcessor
        // 上面的代码是执行子类独有的方法【invokeBeanDefinitionRegistryPostProcessors】
        // 这里需要再把父接口【BeanFactoryPostProcessor】的方法【invokeBeanFactoryPostProcessors】也执行一次!!!
        invokeBeanFactoryPostProcessors(registryProcessors, beanFactory);
        // regularPostProcessors是空的, 跳过
        invokeBeanFactoryPostProcessors(regularPostProcessors, beanFactory);
    }

    else {
        // Invoke factory processors registered with the context instance.
        invokeBeanFactoryPostProcessors(beanFactoryPostProcessors, beanFactory);
    }

    // 12.获取BeanFactoryPostProcessor对应的实现类的名称, 从beanDefinitionNames中获取的, 结果为:internalConfigurationAnnotationProcessor, internalEventListenerProcessor两个name, 对应的BeanDefinition为:ConfigurationClassPostProcessor对应的BeanDefinition, 以及EventListenerMethodProcessor对应的BeanDefinition
    // 【注意:】如果此时我们有自定义的BeanFactoryPostProcessor, 且注册到容器中, 执行到这里的时候我们自定义的BeanFactoryPostProcessor,已经被前面的内置的实现PriorityOrdered接口的BeanDefinitionRegistryPostProcessor--【ConfigurationClassPostProcessor】封装成BeanDefinition并注册到beanDefinitionMap中了
    String[] postProcessorNames =
        beanFactory.getBeanNamesForType(BeanFactoryPostProcessor.class, true, false);
	// 13.将 获取的BeanFactoryPostProcessor进行分类, 按照PriorityOrdered、Ordered以及未排序三个维度
    // 【注意:】我们自定义的BeanFactoryPostProcessor将在这里被初始化完成, 并调用其postProcessBeanFactory
    List<BeanFactoryPostProcessor> priorityOrderedPostProcessors = new ArrayList<>();
    List<String> orderedPostProcessorNames = new ArrayList<>();
    List<String> nonOrderedPostProcessorNames = new ArrayList<>();
    for (String ppName : postProcessorNames) {
        if (processedBeans.contains(ppName)) {
            // ConfigurationClassPostProcessor已经处理过了
        }
        else if (beanFactory.isTypeMatch(ppName, PriorityOrdered.class)) {
            priorityOrderedPostProcessors.add(beanFactory.getBean(ppName, BeanFactoryPostProcessor.class));
        }
        else if (beanFactory.isTypeMatch(ppName, Ordered.class)) {
            orderedPostProcessorNames.add(ppName);
        }
        else {
            // EventListenerMethodProcessor被添加到未排序的列表当中
            nonOrderedPostProcessorNames.add(ppName);
        }
    }


    // 14. 这里priorityOrderedPostProcessors为空, 跳过
    sortPostProcessors(priorityOrderedPostProcessors, beanFactory);
    invokeBeanFactoryPostProcessors(priorityOrderedPostProcessors, beanFactory);

    // 15. 这里orderedPostProcessorNames也为空, 跳过
    List<BeanFactoryPostProcessor> orderedPostProcessors = new ArrayList<>();
    for (String postProcessorName : orderedPostProcessorNames) {
        orderedPostProcessors.add(beanFactory.getBean(postProcessorName, BeanFactoryPostProcessor.class));
    }
    sortPostProcessors(orderedPostProcessors, beanFactory);
    invokeBeanFactoryPostProcessors(orderedPostProcessors, beanFactory);

    // 16. 执行未排序的BeanFactoryPostProcessor, 这里是 EventListenerMethodProcessor
    List<BeanFactoryPostProcessor> nonOrderedPostProcessors = new ArrayList<>();
    for (String postProcessorName : nonOrderedPostProcessorNames) {
        nonOrderedPostProcessors.add(beanFactory.getBean(postProcessorName, BeanFactoryPostProcessor.class));
    }
    invokeBeanFactoryPostProcessors(nonOrderedPostProcessors, beanFactory);

    // Clear cached merged bean definitions since the post-processors might have
    // modified the original metadata, e.g. replacing placeholders in values...
    beanFactory.clearMetadataCache();
}
【5.1 方法总结】
PostProcessorRegistrationDelegate.invokeBeanFactoryPostProcessors的思路很清晰:
1.首先需要知道两个接口, 这个方法就是在围绕两个接口:
BeanFactoryPostProcessor、BeanDefinitionRegistryPostProcessor, 且后者是前者的子接口
BeanFactoryPostProcessor的核心方法:postProcessBeanFactory
BeanDefinitionRegistryPostProcessor的核心方法:postProcessBeanDefinitionRegistry
2.这个方法的执行过程就是:
先找到实现PriorityOrdered接口的BeanDefinitionRegistryPostProcessor, 排序后依次执行他们的postProcessBeanDefinitionRegistry方法;
再找到实现Ordered接口的BeanDefinitionRegistryPostProcessor, 排序后依次执行postProcessBeanDefinitionRegistry
再找到普通的BeanDefinitionRegistryPostProcessor, 依次执行postProcessBeanDefinitionRegistry
最后依次执行上面BeanDefinitionRegistryPostProcessor的postProcessBeanFactory
以上把BeanDefinitionRegistryPostProcessor的postProcessBeanDefinitionRegistry和postProcessBeanFactory都执行完了
继续执行:
把普通的BeanFactoryPostProcessor都找到, 然后依次执行它们的postProcessBeanFactory方法
3.在当前例子中, 实现了PriorityOrdered接口的BeanDefinitionRegistryPostProcessor只有一个【内置的】:
ConfigurationClassPostProcessor,所以要研究它的postProcessBeanDefinitionRegistry方法和postProcessBeanFactory方法
实现了普通的BeanFactoryPostProcessor也只有一个【内置的】:EventListenerMethodProcessor, 需要研究它的postProcessBeanFactory方法
5.2 ConfigurationClassPostProcessor#postProcessBeanDefinitionRegistry()解析【重点方法】
postProcessBeanDefinitionRegistry内部调用的是processConfigBeanDefinitions, 所以当前我们研究processConfigBeanDefinitions方法,
这个方法会解析 @Configuration 标签
public void processConfigBeanDefinitions(BeanDefinitionRegistry registry) {
List<BeanDefinitionHolder> configCandidates = new ArrayList<>();
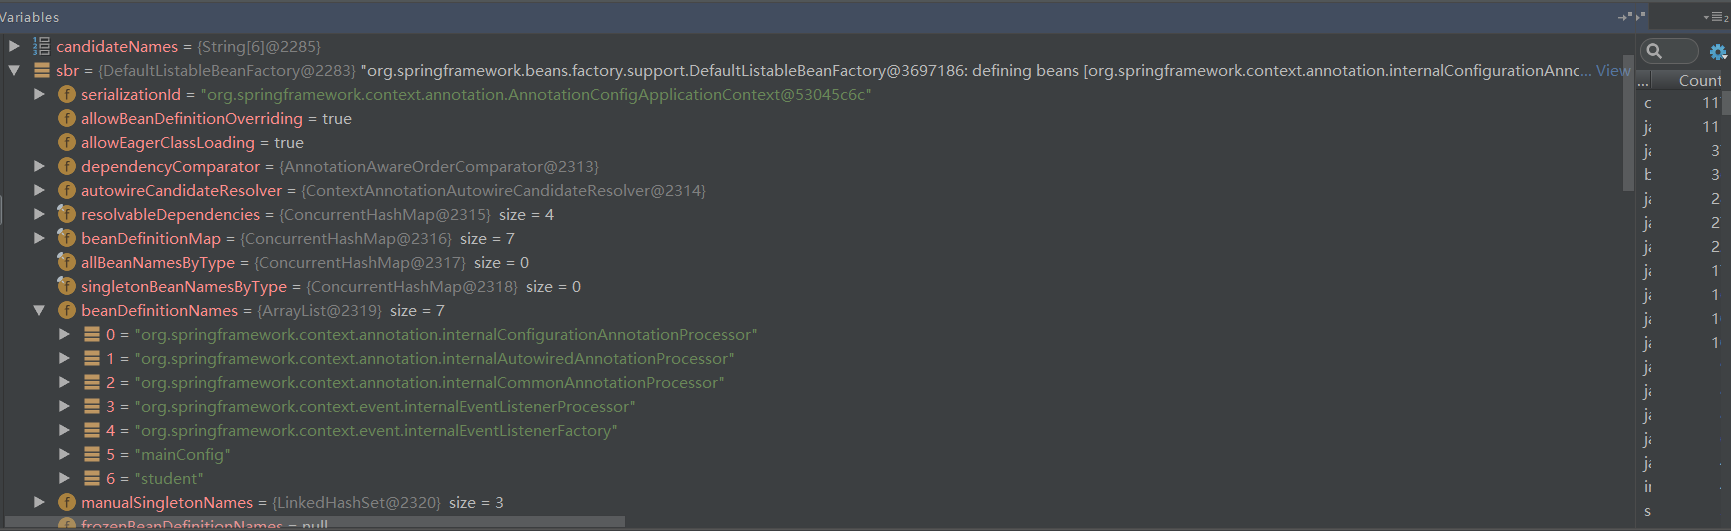
// 1.这里获取的candidateNames一共有6个, 一个自定义的mainConfig, 5个内置的
String[] candidateNames = registry.getBeanDefinitionNames();
for (String beanName : candidateNames) {
BeanDefinition beanDef = registry.getBeanDefinition(beanName);
// 2.上述6个都不满足以下条件
// 内部有两个标记位来标记是否已经处理过了: isFullConfigurationClass, isLiteConfigurationClass
// 当我们注册配置类的时候,可以不加@Configuration注解,直接使用@Component @ComponentScan @Import @ImportResource注解,称之为Lite配置类
// 如果加了@Configuration注解,就称之为Full配置类
// 如果我们注册了Lite配置类,我们getBean这个配置类,会发现它就是原本的那个配置类
// 如果我们注册了Full配置类,我们getBean这个配置类,会发现它已经不是原本那个配置类了,而是已经被cgilb代理的类了
if (ConfigurationClassUtils.isFullConfigurationClass(beanDef) ||
ConfigurationClassUtils.isLiteConfigurationClass(beanDef)) {
if (logger.isDebugEnabled()) {
logger.debug("Bean definition has already been processed as a configuration class: " + beanDef);
}
}
// 3.自定义的mainConfig满足下面条件: 同时修改MainConfig为Full配置类
else if (ConfigurationClassUtils.checkConfigurationClassCandidate(beanDef, this.metadataReaderFactory)) {
configCandidates.add(new BeanDefinitionHolder(beanDef, beanName));
}
}
// 4.校验, 此时不为空, 跳过
if (configCandidates.isEmpty()) {
return;
}
// 5.根据@Order标签排序
configCandidates.sort((bd1, bd2) -> {
int i1 = ConfigurationClassUtils.getOrder(bd1.getBeanDefinition());
int i2 = ConfigurationClassUtils.getOrder(bd2.getBeanDefinition());
return Integer.compare(i1, i2);
});
SingletonBeanRegistry sbr = null;
// 6.DefaultListableBeanFactory会实现SingletonBeanRegistry接口, 进入
if (registry instanceof SingletonBeanRegistry) {
sbr = (SingletonBeanRegistry) registry;
if (!this.localBeanNameGeneratorSet) {
BeanNameGenerator generator = (BeanNameGenerator) sbr.getSingleton(CONFIGURATION_BEAN_NAME_GENERATOR);
// 7.为空, 直接跳过
if (generator != null) {
this.componentScanBeanNameGenerator = generator;
this.importBeanNameGenerator = generator;
}
}
}
// 8.跳过
if (this.environment == null) {
this.environment = new StandardEnvironment();
}
// 9.解析所有@Configuration的类!!!!!!
// 9.1 创建@Configuration配置类解析器
ConfigurationClassParser parser = new ConfigurationClassParser(
this.metadataReaderFactory, this.problemReporter, this.environment,
this.resourceLoader, this.componentScanBeanNameGenerator, registry);
// 9.2 需要被ConfigurationClassParser解析的类
Set<BeanDefinitionHolder> candidates = new LinkedHashSet<>(configCandidates);
// 9.3 已经被ConfigurationClassParser解析的类
Set<ConfigurationClass> alreadyParsed = new HashSet<>(configCandidates.size());
do {
// 9.4 这个方法极其重要!!!在@5.3中单独解析
parser.parse(candidates);
// 9.5 校验
parser.validate();
// 9.6 获取解析完成后的MainConfig对应的ConfigurationClass
Set<ConfigurationClass> configClasses = new LinkedHashSet<>(parser.getConfigurationClasses());
configClasses.removeAll(alreadyParsed);
// Read the model and create bean definitions based on its content
if (this.reader == null) {
// 9.7 创建 ConfigurationClassBeanDefinitionReader 对象
this.reader = new ConfigurationClassBeanDefinitionReader(
registry, this.sourceExtractor, this.resourceLoader, this.environment,
this.importBeanNameGenerator, parser.getImportRegistry());
}
// 9.8 【重点方法】
// 内部调用 ConfigurationClassBeanDefinitionReader.loadBeanDefinitionsForConfigurationClass(..)方法, 见@5.5解析
// 这个方法在内部是解析ConfigurationClass的内部的@Bean方法对应的BeanMethod注册到beanDefinitionMap中
this.reader.loadBeanDefinitions(configClasses);
// 9.9 解析MainConfig完成, 添加到已解析列表中
alreadyParsed.addAll(configClasses);
candidates.clear();
// 9.10 这里beanDefiniton新添加了一个, student对应的BeanDefinition, 大于candidateNames.length
if (registry.getBeanDefinitionCount() > candidateNames.length) {
String[] newCandidateNames = registry.getBeanDefinitionNames();
Set<String> oldCandidateNames = new HashSet<>(Arrays.asList(candidateNames));
Set<String> alreadyParsedClasses = new HashSet<>();
for (ConfigurationClass configurationClass : alreadyParsed) {
alreadyParsedClasses.add(configurationClass.getMetadata().getClassName());
}
for (String candidateName : newCandidateNames) {
if (!oldCandidateNames.contains(candidateName)) {
BeanDefinition bd = registry.getBeanDefinition(candidateName);
if (ConfigurationClassUtils.checkConfigurationClassCandidate(bd, this.metadataReaderFactory) &&
!alreadyParsedClasses.contains(bd.getBeanClassName())) {
candidates.add(new BeanDefinitionHolder(bd, candidateName));
}
}
}
candidateNames = newCandidateNames;
}
}
while (!candidates.isEmpty());
// 暂略
// Register the ImportRegistry as a bean in order to support ImportAware @Configuration classes
if (sbr != null && !sbr.containsSingleton(IMPORT_REGISTRY_BEAN_NAME)) {
sbr.registerSingleton(IMPORT_REGISTRY_BEAN_NAME, parser.getImportRegistry());
}
// 暂略
if (this.metadataReaderFactory instanceof CachingMetadataReaderFactory) {
// Clear cache in externally provided MetadataReaderFactory; this is a no-op
// for a shared cache since it'll be cleared by the ApplicationContext.
((CachingMetadataReaderFactory) this.metadataReaderFactory).clearCache();
}
}
5.3 ConfigurationClassParser#parse(Set configCandidates)解析
内部调用的是【doProcessConfigurationClass(ConfigurationClass configClass, SourceClass sourceClass)】, 最后将解析结果放入到ConfigurationClassParser的configurationClasses中,
下面解析【doProcessConfigurationClass(ConfigurationClass configClass, SourceClass sourceClass)】方法
protected final SourceClass doProcessConfigurationClass(ConfigurationClass configClass, SourceClass sourceClass)
      throws IOException {
   // 1.@Configuration上加了@Component注解, 进入
   if (configClass.getMetadata().isAnnotated(Component.class.getName())) {
      // 递归处理内部类, 这里没有, 跳过
      processMemberClasses(configClass, sourceClass);
   }
   // 2.解析@PropertySources标签, 这里没有, 跳过
   for (AnnotationAttributes propertySource : AnnotationConfigUtils.attributesForRepeatable(
         sourceClass.getMetadata(), PropertySources.class,
         org.springframework.context.annotation.PropertySource.class)) {
      if (this.environment instanceof ConfigurableEnvironment) {
         processPropertySource(propertySource);
      }
      else {
         logger.info("Ignoring @PropertySource annotation on [" + sourceClass.getMetadata().getClassName() +
               "]. Reason: Environment must implement ConfigurableEnvironment");
      }
   }
   // 3.解析@ComponentScan标签, 这里没有, 跳过
   Set<AnnotationAttributes> componentScans = AnnotationConfigUtils.attributesForRepeatable(
         sourceClass.getMetadata(), ComponentScans.class, ComponentScan.class);
   if (!componentScans.isEmpty() &&
         !this.conditionEvaluator.shouldSkip(sourceClass.getMetadata(), ConfigurationPhase.REGISTER_BEAN)) {
      for (AnnotationAttributes componentScan : componentScans) {
         // The config class is annotated with @ComponentScan -> perform the scan immediately
         Set<BeanDefinitionHolder> scannedBeanDefinitions =
               this.componentScanParser.parse(componentScan, sourceClass.getMetadata().getClassName());
         // Check the set of scanned definitions for any further config classes and parse recursively if needed
         for (BeanDefinitionHolder holder : scannedBeanDefinitions) {
            BeanDefinition bdCand = holder.getBeanDefinition().getOriginatingBeanDefinition();
            if (bdCand == null) {
               bdCand = holder.getBeanDefinition();
            }
            if (ConfigurationClassUtils.checkConfigurationClassCandidate(bdCand, this.metadataReaderFactory)) {
               parse(bdCand.getBeanClassName(), holder.getBeanName());
            }
         }
      }
   }
   // 4.解析@Import标签, 这里没有, 跳过
   processImports(configClass, sourceClass, getImports(sourceClass), true);
   // 5.解析@ImportResource标签, 这里没有, 跳过
   AnnotationAttributes importResource =
         AnnotationConfigUtils.attributesFor(sourceClass.getMetadata(), ImportResource.class);
   if (importResource != null) {
      String[] resources = importResource.getStringArray("locations");
      Class<? extends BeanDefinitionReader> readerClass = importResource.getClass("reader");
      for (String resource : resources) {
         String resolvedResource = this.environment.resolveRequiredPlaceholders(resource);
         configClass.addImportedResource(resolvedResource, readerClass);
      }
   }
   // 6.处理内部@Bean标签
   // 提取 带有注解的所有方法, 封装成BeanMethod, 添加到对应的ConfigClass中
    // 本例中, 将student()方法, 放入到mainConfig中
   Set<MethodMetadata> beanMethods = retrieveBeanMethodMetadata(sourceClass);
   for (MethodMetadata methodMetadata : beanMethods) {
      configClass.addBeanMethod(new BeanMethod(methodMetadata, configClass));
   }
   // 7.处理MainConfig父接口的基本方法, 这里没有, 跳过
   processInterfaces(configClass, sourceClass);
   // 8.处理MainConfig父类的基本方法, 这里没有, 跳过
   if (sourceClass.getMetadata().hasSuperClass()) {
      String superclass = sourceClass.getMetadata().getSuperClassName();
      if (superclass != null && !superclass.startsWith("java") &&
            !this.knownSuperclasses.containsKey(superclass)) {
         this.knownSuperclasses.put(superclass, configClass);
         // Superclass found, return its annotation metadata and recurse
         return sourceClass.getSuperClass();
      }
   }

   // No superclass -> processing is complete
   return null;
}
【5.3 方法总结】
当前方法主要使用ConfigurationClassParser来处理我们主配置类对应的ConfigurationClass, 这里我们的主配置类是:MainConfig
递归处理 内部类、@PropertySources、@ComponentScan、@Import、@ImportResource、内部@Bean标签
5.4 ConfigurationClassBeanDefinitionReader#loadBeanDefinitionsForConfigurationClass()解析
这里的configClass是MainConfig对应的Configuration
private void loadBeanDefinitionsForConfigurationClass(
    ConfigurationClass configClass, TrackedConditionEvaluator trackedConditionEvaluator) {
	// 不会跳过
    if (trackedConditionEvaluator.shouldSkip(configClass)) {
        String beanName = configClass.getBeanName();
        if (StringUtils.hasLength(beanName) && this.registry.containsBeanDefinition(beanName)) {
            this.registry.removeBeanDefinition(beanName);
        }
        this.importRegistry.removeImportingClass(configClass.getMetadata().getClassName());
        return;
    }
	// 不是@Import
    if (configClass.isImported()) {
        registerBeanDefinitionForImportedConfigurationClass(configClass);
    }
    // 处理@Bean标签的方法, 这里是student()方法
    for (BeanMethod beanMethod : configClass.getBeanMethods()) {
        // 见@5.5解析
        // 核心:将student和对应的BeanDefinition放入beanDefinitionMap 和 beanDefinitionNames中
        loadBeanDefinitionsForBeanMethod(beanMethod);
    }
	// importedResources 为空, 跳过
    loadBeanDefinitionsFromImportedResources(configClass.getImportedResources());
    // importBeanDefinitionRegistrars 为空, 跳过
    loadBeanDefinitionsFromRegistrars(configClass.getImportBeanDefinitionRegistrars());
}
5.5 ConfigurationClassBeanDefinitionReader#loadBeanDefinitionsForBeanMethod(BeanMethod beanMethod)方法解析
这里的BeanMethod是@Bean student()方法对应的 BeanMethod
private void loadBeanDefinitionsForBeanMethod(BeanMethod beanMethod) {
    // 获取student()方法所在的配置类 即MainConfig对应的ConfigurationClass
    ConfigurationClass configClass = beanMethod.getConfigurationClass();
    // 获取student()方法的所有标签元数据
    MethodMetadata metadata = beanMethod.getMetadata();
    // 获取方法名, 即student
    String methodName = metadata.getMethodName();

    // student()方法不会被跳过
    if (this.conditionEvaluator.shouldSkip(metadata, ConfigurationPhase.REGISTER_BEAN)) {
        configClass.skippedBeanMethods.add(methodName);
        return;
    }
    if (configClass.skippedBeanMethods.contains(methodName)) {
        return;
    }
	// 获取Bean标签里的所有属性
    AnnotationAttributes bean = AnnotationConfigUtils.attributesFor(metadata, Bean.class);
    Assert.state(bean != null, "No @Bean annotation attributes");

    // bean的name优先使用@Bean的name属性, 如果为空, 则用方法名, 这里用方法名-student
    List<String> names = new ArrayList<>(Arrays.asList(bean.getStringArray("name")));
    String beanName = (!names.isEmpty() ? names.remove(0) : methodName);

    // 这里names为空, 跳过
    for (String alias : names) {
        this.registry.registerAlias(beanName, alias);
    }

    // Has this effectively been overridden before (e.g. via XML)?
    // 是否需要被覆盖, 这里不需要, 跳过
    if (isOverriddenByExistingDefinition(beanMethod, beanName)) {
        if (beanName.equals(beanMethod.getConfigurationClass().getBeanName())) {
            throw new BeanDefinitionStoreException(beanMethod.getConfigurationClass().getResource().getDescription(),
                  beanName, "Bean name derived from @Bean method '" + beanMethod.getMetadata().getMethodName() +
                  "' clashes with bean name for containing configuration class; please make those names unique!");
        }
        return;
    }

    // 创建MainConfig对应的BeanDefinition对象【ConfigurationClassBeanDefinition】!!!
    ConfigurationClassBeanDefinition beanDef = new ConfigurationClassBeanDefinition(configClass, metadata);
    beanDef.setResource(configClass.getResource());
    beanDef.setSource(this.sourceExtractor.extractSource(metadata, configClass.getResource()));

    if (metadata.isStatic()) {
        // static @Bean method
        beanDef.setBeanClassName(configClass.getMetadata().getClassName());
        beanDef.setFactoryMethodName(methodName);
    }
    else {
        // instance @Bean method
        // student方法是实例方法
        // factoryBeanName为mainConfig
        beanDef.setFactoryBeanName(configClass.getBeanName());
        // uniqueFactoryMethodName为student
        beanDef.setUniqueFactoryMethodName(methodName);
    }
    // 设置autowire模式
    beanDef.setAutowireMode(AbstractBeanDefinition.AUTOWIRE_CONSTRUCTOR);
    beanDef.setAttribute(org.springframework.beans.factory.annotation.RequiredAnnotationBeanPostProcessor.
                         SKIP_REQUIRED_CHECK_ATTRIBUTE, Boolean.TRUE);
	// 处理student方法上的其他标签, 如@Lazy, @Primary, @DependOn, @Role, @Description等
    AnnotationConfigUtils.processCommonDefinitionAnnotations(beanDef, metadata);

    Autowire autowire = bean.getEnum("autowire");
    if (autowire.isAutowire()) {
        // 修改autowireMode
        beanDef.setAutowireMode(autowire.value());
    }
	// 跳过
    boolean autowireCandidate = bean.getBoolean("autowireCandidate");
    if (!autowireCandidate) {
        beanDef.setAutowireCandidate(false);
    }
	// 跳过initMethodName属性
    String initMethodName = bean.getString("initMethod");
    if (StringUtils.hasText(initMethodName)) {
        beanDef.setInitMethodName(initMethodName);
    }
    // 处理destroyMethod属性, 跳过
    String destroyMethodName = bean.getString("destroyMethod");
    beanDef.setDestroyMethodName(destroyMethodName);

    // 处理scope标签, 这里跳过
    ScopedProxyMode proxyMode = ScopedProxyMode.NO;
    AnnotationAttributes attributes = AnnotationConfigUtils.attributesFor(metadata, Scope.class);
    if (attributes != null) {
        beanDef.setScope(attributes.getString("value"));
        proxyMode = attributes.getEnum("proxyMode");
        if (proxyMode == ScopedProxyMode.DEFAULT) {
            proxyMode = ScopedProxyMode.NO;
        }
    }

    // Replace the original bean definition with the target one, if necessary
    // 是否采用代理方式替换原生的bean
    BeanDefinition beanDefToRegister = beanDef;
    if (proxyMode != ScopedProxyMode.NO) {
        BeanDefinitionHolder proxyDef = ScopedProxyCreator.createScopedProxy(
            new BeanDefinitionHolder(beanDef, beanName), this.registry,
            proxyMode == ScopedProxyMode.TARGET_CLASS);
        beanDefToRegister = new ConfigurationClassBeanDefinition(
            (RootBeanDefinition) proxyDef.getBeanDefinition(), configClass, metadata);
    }

    if (logger.isTraceEnabled()) {
        logger.trace(String.format("Registering bean definition for @Bean method %s.%s()",
                                   configClass.getMetadata().getClassName(), beanName));
    }
    // 注册BeanDefinition, 核心方法
    // beanName: student  registy: DefaultListableBeanFactory
    // 将student和对应的BeanDefinition对象放入 beanDefinitionMap, beanDefinitionNames中
    this.registry.registerBeanDefinition(beanName, beanDefToRegister);
}
此时的beanFactory, beanDefinitionMap中已经有了7个, 其中5个内置的, 还有一个mainConfig,一个student
5.6 ConfigurationClassPostProcessor#postProcessBeanFactory()方法解析
我们在@5.1 中的总结里提到过, 本质就是先后执行BeanDefinitionRegistryPostProcessor的postProcessBeanDefinitionRegistry方法和postProcessBeanFactory方法,这里只有一个内置的BeanDefinitionRegistryPostProcessor,即ConfigurationClassPostProcessor,上面我们介绍了ConfigurationClassPostProcessor的postProcessBeanDefinitionRegistry方法,接下来就需要解析它的postProcessBeanFactory方法了
/**
 * Prepare the Configuration classes for servicing bean requests at runtime
 * by replacing them with CGLIB-enhanced subclasses.
 * 翻译: 通过用CGLIB增强的子类替换Configuration类,在运行时为bean提供服务。
 */
@Override
public void postProcessBeanFactory(ConfigurableListableBeanFactory beanFactory) {
    int factoryId = System.identityHashCode(beanFactory);
    // 这里跳过
    if (this.factoriesPostProcessed.contains(factoryId)) {
        throw new IllegalStateException(
            "postProcessBeanFactory already called on this post-processor against " + beanFactory);
    }
    this.factoriesPostProcessed.add(factoryId);
    // 跳过
    if (!this.registriesPostProcessed.contains(factoryId)) {
        // BeanDefinitionRegistryPostProcessor hook apparently not supported...
        // Simply call processConfigurationClasses lazily at this point then.
        processConfigBeanDefinitions((BeanDefinitionRegistry) beanFactory);
    }
	// 1.增强beanFactory里的@Configuration主配置类, 采用cglib的方式, 我们在@5.7中解析当前方法
    // 这里我们会用增强的MainConfig替换原生MainConfig
    enhanceConfigurationClasses(beanFactory);
    // 2. 再增加一个BeanPostProcessors 【ImportAwareBeanPostProcessor】
    // 这里一共有3个BeanPostProcessor:
    // ApplicationContextAwareProcessor, ApplicationListenerDetector, ImportAwareBeanPostProcessor
    // 前面两个是在@ 3.prepareBeanFactory(beanFactory)方法中添加的
    beanFactory.addBeanPostProcessor(new ImportAwareBeanPostProcessor(beanFactory));
}
5.7 ConfigurationClassPostProcessor#enhanceConfigurationClasses(beanFactory)方法解析
/**
 * Post-processes a BeanFactory in search of Configuration class BeanDefinitions;
 * any candidates are then enhanced by a {@link ConfigurationClassEnhancer}.
 * Candidate status is determined by BeanDefinition attribute metadata.
 * @see ConfigurationClassEnhancer
 * 翻译: 后置处理BeanFactory, 查找@Configuration对应的BeanDefinition;
 * 所有 @Configuration 的类都会被增强
 */
public void enhanceConfigurationClasses(ConfigurableListableBeanFactory beanFactory) {
    // 这里存放的是@Configuration类对应的BeanDefinition
    Map<String, AbstractBeanDefinition> configBeanDefs = new LinkedHashMap<>();
    // 1.遍历beanDefinitionNames, 里面有7个元素, 有5个内置的, 还有两个: mainConfig 和 student
    for (String beanName : beanFactory.getBeanDefinitionNames()) {
        BeanDefinition beanDef = beanFactory.getBeanDefinition(beanName);
        // 2.这里我们只需要 @Configuration的
        if (ConfigurationClassUtils.isFullConfigurationClass(beanDef)) {
            if (!(beanDef instanceof AbstractBeanDefinition)) {
                throw new BeanDefinitionStoreException("Cannot enhance @Configuration bean definition '" +
                                                       beanName + "' since it is not stored in an AbstractBeanDefinition subclass");
            }
            else if (logger.isInfoEnabled() && beanFactory.containsSingleton(beanName)) {
                logger.info("Cannot enhance @Configuration bean definition '" + beanName +
                            "' since its singleton instance has been created too early. The typical cause " +
                            "is a non-static @Bean method with a BeanDefinitionRegistryPostProcessor " +
                            "return type: Consider declaring such methods as 'static'.");
            }
            configBeanDefs.put(beanName, (AbstractBeanDefinition) beanDef);
        }
    }
    // 3.这里拿到了mainConfig, 不为空, 跳过
    if (configBeanDefs.isEmpty()) {
        // nothing to enhance -> return immediately
        return;
    }

    ConfigurationClassEnhancer enhancer = new ConfigurationClassEnhancer();
    for (Map.Entry<String, AbstractBeanDefinition> entry : configBeanDefs.entrySet()) {
        AbstractBeanDefinition beanDef = entry.getValue();
        // If a @Configuration class gets proxied, always proxy the target class
        beanDef.setAttribute(AutoProxyUtils.PRESERVE_TARGET_CLASS_ATTRIBUTE, Boolean.TRUE);
        try {
            // Set enhanced subclass of the user-specified bean class
            // 4.获取Class<MainConfig>
            Class<?> configClass = beanDef.resolveBeanClass(this.beanClassLoader);
            if (configClass != null) {
                // 5.生成Class<MainConfig>增强类 Class< com.tca.spring.framework.learning.ioc.config.MainConfig$$EnhancerBySpringCGLIB$$8da450e4>
                Class<?> enhancedClass = enhancer.enhance(configClass, this.beanClassLoader);
                if (configClass != enhancedClass) {
                    if (logger.isTraceEnabled()) {
                        logger.trace(String.format("Replacing bean definition '%s' existing class '%s' with " +
                                                   "enhanced class '%s'", entry.getKey(), configClass.getName(), enhancedClass.getName()));
                    }
                    // 修改MainConfig对应的BeanDefinition中的beanClass, 之前指向MainConfig, 现在替换成MainConfig的增强类 MainConfig$$EnhancerBySpringCGLIB$$8da450e4
                    beanDef.setBeanClass(enhancedClass);
                }
            }
        }
        catch (Throwable ex) {
            throw new IllegalStateException("Cannot load configuration class: " + beanDef.getBeanClassName(), ex);
        }
    }
}
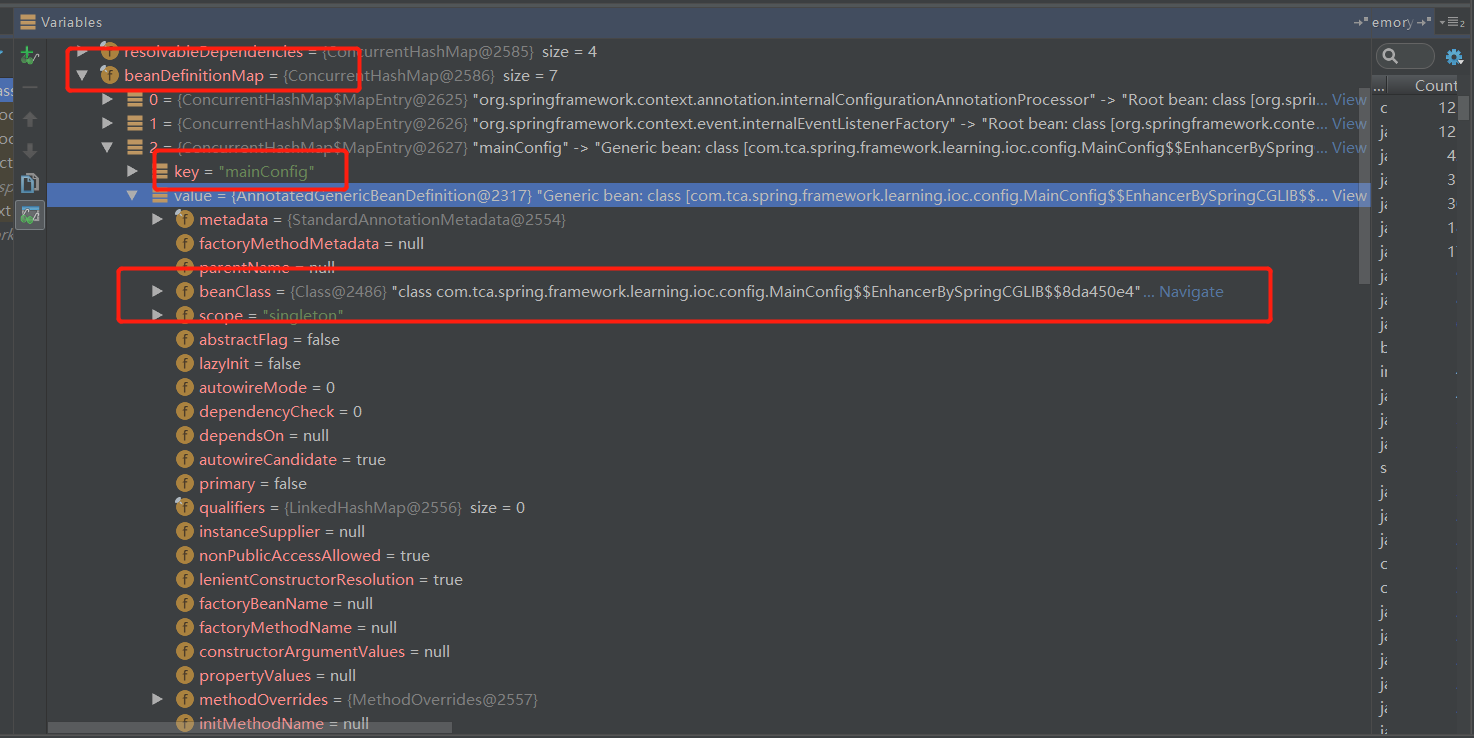
【5.2 - 5.7方法总结】
1.在上述方法中, 我们已经处理了唯一的内置 BeanDefinitionRegistryPostProcessor【ConfigurationClassPostProcessor】, 先后执行了 它的postProcessBeanDefinitionRegistry方法和 postProcessBeanFactory方法
2.它的postProcessBeanDefinitionRegistry方法主要是:
	解析@Configuration对应的配置类, 将@Configuration配置类里的@Bean标签对应的方法取出, 封装成BeanDefinition, 注册到
	BeanDefinitionMap和BeanDefinitionNames中
3.它的postProcessBeanFactory方法主要是:
	找到@Configuration配置类对应的BeanDefinition, 替换BeanDefinition中beanClass为cglib增强后的配置类
4.接下来, 就需要处理普通的BeanFacotryPostProcessor, 这里也只剩一个了:EventListenerMethodProcessor, 解析它的postProcessBeanFactory()方法
5.8 EventListenerMethodProcessor.postProcessBeanFactory()方法解析
@Override
public void postProcessBeanFactory(ConfigurableListableBeanFactory beanFactory) {
   this.beanFactory = beanFactory;
   // 找到EventListenerFactory对象, 这里只有一个:
   // org.springframework.context.event.internalEventListenerFactory - DefaultEventListenerFactory
   Map<String, EventListenerFactory> beans = beanFactory.getBeansOfType(EventListenerFactory.class, false, false);
   List<EventListenerFactory> factories = new ArrayList<>(beans.values());
   AnnotationAwareOrderComparator.sort(factories);
   this.eventListenerFactories = factories;
}
至此, @5.1 的方法已经全部执行完毕, 回到@5, @5中接下来的条件不满足, 也直接跳过, 所以此时@5全部执行完毕!!!
总结
1.首先需要知道两个接口, 整个方法就是在围绕两个接口:
BeanFactoryPostProcessor、BeanDefinitionRegistryPostProcessor, 且后者是前者的子接口
BeanFactoryPostProcessor的核心方法:postProcessBeanFactory
BeanDefinitionRegistryPostProcessor的核心方法:postProcessBeanDefinitionRegistry
2.这个方法的执行过程就是:
先找到实现PriorityOrdered接口的BeanDefinitionRegistryPostProcessor, 排序后依次执行他们的postProcessBeanDefinitionRegistry方法;
再找到实现Ordered接口的BeanDefinitionRegistryPostProcessor, 排序后依次执行postProcessBeanDefinitionRegistry
再找到普通的BeanDefinitionRegistryPostProcessor, 依次执行postProcessBeanDefinitionRegistry
最后依次执行上面BeanDefinitionRegistryPostProcessor的postProcessBeanFactory
以上把BeanDefinitionRegistryPostProcessor的postProcessBeanDefinitionRegistry和postProcessBeanFactory都执行完了
继续执行:
把普通的BeanFactoryPostProcessor都找到, 然后依次执行它们的postProcessBeanFactory方法
3.在当前例子中, 实现了PriorityOrdered接口的BeanDefinitionRegistryPostProcessor只有一个【内置的】:
ConfigurationClassPostProcessor,所以要研究它的postProcessBeanDefinitionRegistry方法和postProcessBeanFactory方法
实现了普通的BeanFactoryPostProcessor也只有一个【内置的】:EventListenerMethodProcessor, 需要研究它的postProcessBeanFactory方法
4.在上述方法中, 我们已经处理了唯一的内置 BeanDefinitionRegistryPostProcessor【ConfigurationClassPostProcessor】, 先后执行了 它的postProcessBeanDefinitionRegistry方法和 postProcessBeanFactory方法
它的postProcessBeanDefinitionRegistry方法主要是:
	解析@Configuration对应的配置类, 将@Configuration配置类里的@Bean标签对应的方法取出, 封装成BeanDefinition, 注册到
	BeanDefinitionMap和BeanDefinitionNames中
它的postProcessBeanFactory方法主要是:
	找到@Configuration配置类对应的BeanDefinition, 替换BeanDefinition中beanClass为cglib增强后的配置类
接下来, 就需要处理普通的BeanFacotryPostProcessor, 这里也只剩一个了:EventListenerMethodProcessor, 解析它的postProcessBeanFactory()方法
问题解答:
1.我们自定义的BeanFactoryPostProcessor,并注册到容器中,构造器方法在什么时候执行,postProcessBeanFactory在什么时候执行
@Slf4j
public class CustomBeanFactoryPostProcessor implements BeanFactoryPostProcessor {

    public CustomBeanFactoryPostProcessor() {
        log.info("CustomBeanFactoryPostProcessor构造器被执行");
    }

    @Override
    public void postProcessBeanFactory(ConfigurableListableBeanFactory beanFactory) throws BeansException {
        log.info("自定义CustomBeanFactoryPostProcessor.postProcess()");
    }
}
根据invokeBeanFactoryPostProcessors方法分析我们知道:
1.这个方法会优先执行ConfigurationClassPostProcessor的postProcessBeanDefinitionRegistry方法,这个方法会解析我们的@Configuration配置类, 把配置类中通过@ComponentScan、@Import、@Bean等方式注册到spring容器中的类, 全部解析封装成BeanDefinition对象, 放入beanFactory【DefaultListableBeanFactory】的beanDefinitionMap中, 所以这个时候, 我们自定义的
CustomBeanFactoryPostProcessor已经被解析封装成BeanDefinition对象了
2.等ConfigurationClassPostProcessor执行完postProcessBeanDefinitionRegistry方法和postProcessBeanFactory方法后, 就开始解析普通的BeanFactoryPostProcessor了
3.此时, 会从beanDefinitionMap中找到所有BeanFacotyPostProcessor对应的BeanDefinition, 见方法@5.1的第12步, 然后使用getBean()方法获取实例对象, 此时会初始化BeanFacotyPostProcessor对象, 调用构造器方法, 这里, 我们自定义的CustomBeanFactoryPostProcessor构造器方法被调用了
4.初始化完成后会添加到list中, 遍历执行postProcessBeanFactory方法, 此时自定义的postProcessBeanFactory方法也被执行了
6. AbstractApplicationContext#registerBeanPostProcessors(beanFactory)
注册拦截bean创建的BeanPostProcessor
/**
 * Instantiate and register all BeanPostProcessor beans,
 * respecting explicit order if given.
 * <p>Must be called before any instantiation of application beans.
 * 翻译: 按照顺序, 实例化并注册所有BeanPostProcessor
 * BeanPostProcessor是在普通Bean实例化之前创建并实例化完成的
 */
protected void registerBeanPostProcessors(ConfigurableListableBeanFactory beanFactory) {
    PostProcessorRegistrationDelegate.registerBeanPostProcessors(beanFactory, this);
}
6.1 PostProcessorRegistrationDelegate#registerBeanPostProcessors(beanFactory, applicationContext)
public static void registerBeanPostProcessors(
    ConfigurableListableBeanFactory beanFactory, AbstractApplicationContext applicationContext) {
	// 1.从beanDefinitionNames中找到两个内置的BeanPostProcessor:
    // internalAutowiredAnnotationProcessor
    // internalCommonAnnotationProcessor
    // 【注意:】我们自定义的BeanPostProcessor会在@5执行中被封装成BeanDefintion, 注册到beanDefinitionMap中
    String[] postProcessorNames = beanFactory.getBeanNamesForType(BeanPostProcessor.class, true, false);

    // Register BeanPostProcessorChecker that logs an info message when
    // a bean is created during BeanPostProcessor instantiation, i.e. when
    // a bean is not eligible for getting processed by all BeanPostProcessors.
    // 翻译: 注册BeanPostProcessorChecker,当一个bean是在BeanPostProcessor实例化期间创建的,即它不能被所有beanPostProcessor处理时, 打印日志
    // 2.此时已经包含的BeanPostProcessors有:
    // AbstractBeanFactory中已经包含的beanPostProcessors, 有3个:ApplicationContextAwareProcessor, ApplicationListenerDetector, ImportAwareBeanPostProcessor
    // 新加入的一个 BeanPostProcessorChecker,
    // 以及: beanDefinitionNames在this()方法中就添加的两个:internalAutowiredAnnotationProcessor, internalCommonAnnotationProcessor
    // 所以这里一共有6个
    int beanProcessorTargetCount = beanFactory.getBeanPostProcessorCount() + 1 + postProcessorNames.length;
    beanFactory.addBeanPostProcessor(new BeanPostProcessorChecker(beanFactory, beanProcessorTargetCount));

    // 3.根据PriorityOrdered, Ordered, 未实现排序的分开处理
    // 实现PriorityOrdered的BeanPostProcessor
    List<BeanPostProcessor> priorityOrderedPostProcessors = new ArrayList<>();
    // 内置的 , 实现MergedBeanDefinitionPostProcessor的 BeanPostProcessor
    List<BeanPostProcessor> internalPostProcessors = new ArrayList<>();
    // 实现Ordered的BeanPostProcessor
    List<String> orderedPostProcessorNames = new ArrayList<>();
    // 未实现排序的BeanPostProcessor
    List<String> nonOrderedPostProcessorNames = new ArrayList<>();
    // 4.遍历postProcessorNames, 有两个内置的, 且都实现了PriorityOrdered, 分别是:
    // (internalAutowiredAnnotationProcessor, AutowiredAnnotationBeanPostProcessor对应的BeanDefinition)
	// (internalCommonAnnotationProcessor, CommonAnnotationBeanPostProcessor对应的BeanDefinition)
    for (String ppName : postProcessorNames) {
        if (beanFactory.isTypeMatch(ppName, PriorityOrdered.class)) {
            BeanPostProcessor pp = beanFactory.getBean(ppName, BeanPostProcessor.class);
            priorityOrderedPostProcessors.add(pp);
            if (pp instanceof MergedBeanDefinitionPostProcessor) {
                internalPostProcessors.add(pp);
            }
        }
        else if (beanFactory.isTypeMatch(ppName, Ordered.class)) {
            orderedPostProcessorNames.add(ppName);
        }
        else {
            nonOrderedPostProcessorNames.add(ppName);
        }
    }

    // First, register the BeanPostProcessors that implement PriorityOrdered.
    // 5.排序实现了PriorityOrdered的
    sortPostProcessors(priorityOrderedPostProcessors, beanFactory);
    // 6.把实现了PriorityOrdered的BeanPostProcessor添加到 AbstractBeanFactory中的 beanPostProcessors中,
    // 现在6个BeanPostProcessor都在 beanPostProcessors中
    registerBeanPostProcessors(beanFactory, priorityOrderedPostProcessors);

    // 7.排序并注册实现Ordered接口的BeanPostProcessors, 这里为空, 跳过
    List<BeanPostProcessor> orderedPostProcessors = new ArrayList<>();
    for (String ppName : orderedPostProcessorNames) {
        BeanPostProcessor pp = beanFactory.getBean(ppName, BeanPostProcessor.class);
        orderedPostProcessors.add(pp);
        if (pp instanceof MergedBeanDefinitionPostProcessor) {
            internalPostProcessors.add(pp);
        }
    }
    sortPostProcessors(orderedPostProcessors, beanFactory);
    registerBeanPostProcessors(beanFactory, orderedPostProcessors);

    // 8.排序并注册普通的BeanPostProcessors, 这里为空, 跳过
    List<BeanPostProcessor> nonOrderedPostProcessors = new ArrayList<>();
    for (String ppName : nonOrderedPostProcessorNames) {
        BeanPostProcessor pp = beanFactory.getBean(ppName, BeanPostProcessor.class);
        nonOrderedPostProcessors.add(pp);
        if (pp instanceof MergedBeanDefinitionPostProcessor) {
            internalPostProcessors.add(pp);
        }
    }
    registerBeanPostProcessors(beanFactory, nonOrderedPostProcessors);

    // 9.排序并注册内部BeanPostProcessors, 这里有两个, 且都为PriorityOrdered, 所在在这里重新删除又添加了一次
    sortPostProcessors(internalPostProcessors, beanFactory);
    registerBeanPostProcessors(beanFactory, internalPostProcessors);

    // Re-register post-processor for detecting inner beans as ApplicationListeners,
    // moving it to the end of the processor chain (for picking up proxies etc).
    // 10.再添加注册一个BeanPostProcessor 【ApplicationListenerDetector】
    // 这里ApplicationListenerDetector在@3方法中已经添加过, 所以这里把之前添加的删除了, 把新创建的放到列表最后一个, 所以这里一共还是6个
    beanFactory.addBeanPostProcessor(new ApplicationListenerDetector(applicationContext));
}
总结
1.这个方法比较简单, 根据PriorityOrdered, Ordered接口排序, 并注册排序好的BeanPostProcessor, 把BeanPostProcessor实例化后添加到 AbstractBeanFactory的beanPostProcessors中, 此时一共有6个;
2.如果我们自定义了 BeanPostProcessors 也会被实例化并添加进去
3.此时BeanPostProcessor的核心方法还没有执行, 他们会在普通bean的实例化前后执行
问题解答:
1.我们自定义的BeanPostProcessor,并注册到容器中,构造器方法在什么时候执行
根据registerBeanPostProcessors方法分析我们知道:
1.我们在@5方法中已经将我们自定义的普通bean封装成BeanDefinition对象, 放到beanFactory的beanDefinitionMap中, 我们在@6.1方法一开始就从beanDefinitionMap中获取所有BeanPostProcessor对应的BeanDefinition对象
2.@6.1的第8步中, 我们调用getBean()方法获取实例对象, 此时会初始化BeanPostProcessor对象, 调用构造器方法, 这里, 我们自定义的CustomBeanPostProcessor构造器方法被调用了
7. AbstractApplicationContext#initMessageSource()
/**
 * Initialize the MessageSource.
 * Use parent's if none defined in this context.
 * 翻译: 初始化MessageSource, 如果当前类中没有, 使用父类的
 */
protected void initMessageSource() {
    // 1.获取beanFactory
    ConfigurableListableBeanFactory beanFactory = getBeanFactory();
    // 2.判断容器中是否已经有messageSource, 下面解析beanFactory.containsLocalBean(name)方法
    /* public boolean containsLocalBean(String name) {
	 *	String beanName = transformedBeanName(name);
	 *	return ((containsSingleton(beanName)   // containsSingleton, 判断DefaultListableBeanFactory的父类		    DefaultSingtonBeanRegistry 的一级缓存 singtonObjects中有没有
	 *    || containsBeanDefinition(beanName))  // containsBeanDefinition, 判断beanDefinitionMap中有没有
	 *    && (!BeanFactoryUtils.isFactoryDereference(name) // 判断name是否以&开头
	 *    || isFactoryBean(beanName))); //判断是不是FactoryBean
	 * }
	 */
    // 这里没有, 需要跳过
    if (beanFactory.containsLocalBean(MESSAGE_SOURCE_BEAN_NAME)) {
        this.messageSource = beanFactory.getBean(MESSAGE_SOURCE_BEAN_NAME, MessageSource.class);
        // Make MessageSource aware of parent MessageSource.
        if (this.parent != null && this.messageSource instanceof HierarchicalMessageSource) {
            HierarchicalMessageSource hms = (HierarchicalMessageSource) this.messageSource;
            if (hms.getParentMessageSource() == null) {
                // Only set parent context as parent MessageSource if no parent MessageSource
                // registered already.
                hms.setParentMessageSource(getInternalParentMessageSource());
            }
        }
        if (logger.isTraceEnabled()) {
            logger.trace("Using MessageSource [" + this.messageSource + "]");
        }
    }
    else {
        // Use empty MessageSource to be able to accept getMessage calls.
        // 3.创建MessageSource实例【DelegatingMessageSource】
        DelegatingMessageSource dms = new DelegatingMessageSource();
        dms.setParentMessageSource(getInternalParentMessageSource());
        // 4.将beanFactory的messageSource指向当前DelegatingMessageSource
        this.messageSource = dms;
        // 5.registrySington将当前MessageSource放入到一级缓存singtonObjects中
        beanFactory.registerSingleton(MESSAGE_SOURCE_BEAN_NAME, this.messageSource);
        if (logger.isTraceEnabled()) {
            logger.trace("No '" + MESSAGE_SOURCE_BEAN_NAME + "' bean, using [" + this.messageSource + "]");
        }
    }
}
总结
初始化MessageSource对象, 赋给beanFactory对象的messageSource属性, 同时放入到一级缓存singtonObjects中
8. AbstractApplicationContext#initApplicationEventMulticaster()
/**
 * Initialize the ApplicationEventMulticaster.
 * Uses SimpleApplicationEventMulticaster if none defined in the context.
 * @see org.springframework.context.event.SimpleApplicationEventMulticaster
 * 翻译: 初始化ApplicationEventMulticaster, 如果没有, 则使用 SimpleApplicationEventMulticaster
 */
protected void initApplicationEventMulticaster() {
    // 1.获取beanFactory
    ConfigurableListableBeanFactory beanFactory = getBeanFactory();
    // 2.跟@7 一样, 容器中没有, 这里跳过
    if (beanFactory.containsLocalBean(APPLICATION_EVENT_MULTICASTER_BEAN_NAME)) {
        this.applicationEventMulticaster =
            beanFactory.getBean(APPLICATION_EVENT_MULTICASTER_BEAN_NAME, ApplicationEventMulticaster.class);
        if (logger.isTraceEnabled()) {
            logger.trace("Using ApplicationEventMulticaster [" + this.applicationEventMulticaster + "]");
        }
    }
    else {
        // 3.创建默认的 SimpleApplicationEventMulticaster, 赋值给beanFactory
        this.applicationEventMulticaster = new SimpleApplicationEventMulticaster(beanFactory);
        // 4.registrySington将当前applicationEventMulticaster放入到一级缓存singtonObjects中
        beanFactory.registerSingleton(APPLICATION_EVENT_MULTICASTER_BEAN_NAME, this.applicationEventMulticaster);
        if (logger.isTraceEnabled()) {
            logger.trace("No '" + APPLICATION_EVENT_MULTICASTER_BEAN_NAME + "' bean, using " +
                         "[" + this.applicationEventMulticaster.getClass().getSimpleName() + "]");
        }
    }
}
总结
跟@7的处理类似, 初始化ApplicationEventMulticaster, 赋给beanFactory对象的applicationEventMulticaster属性, 同时放入到一级缓存singtonObjects中
9. AbstractApplicationContext#onRefresh()
跟@4一样, 空实现, 等子类扩展
10. AbstractApplicationContext#registerListeners()
/**
 * Add beans that implement ApplicationListener as listeners.
 * Doesn't affect other listeners, which can be added without being beans.
 * 翻译: 添加实现 ApplicationListener 的 listener
 */
protected void registerListeners() {
    // Register statically specified listeners first.
    // 1.获取 AbstractApplicationContext 中的applicationListeners, 目前是空的, 跳过
    for (ApplicationListener<?> listener : getApplicationListeners()) {
        getApplicationEventMulticaster().addApplicationListener(listener);
    }

    // Do not initialize FactoryBeans here: We need to leave all regular beans
    // uninitialized to let post-processors apply to them!
    // 翻译: 这里不用初始化beans, 我们会在后面先使用BeanPostProcess后置处理器来处理它们
    // 2.获取所有的 ApplicationListener实现类, 这里也是空的
    String[] listenerBeanNames = getBeanNamesForType(ApplicationListener.class, true, false);
    for (String listenerBeanName : listenerBeanNames) {
        getApplicationEventMulticaster().addApplicationListenerBean(listenerBeanName);
    }

    // Publish early application events now that we finally have a multicaster...
    // 派发earlyApplicationEvents事件, 这里是空的, 跳过
    Set<ApplicationEvent> earlyEventsToProcess = this.earlyApplicationEvents;
    this.earlyApplicationEvents = null;
    if (earlyEventsToProcess != null) {
        for (ApplicationEvent earlyEvent : earlyEventsToProcess) {
            getApplicationEventMulticaster().multicastEvent(earlyEvent);
        }
    }
}
总结
这里默认是空的, 后面会补充 自定义ApplicationListenerBean
11.AbstractApplicationContext#finishBeanFactoryInitialization(beanFactory)【核心方法】
前提
在前面的方法中, 已经:
1.BeanFactoryPostProcessor(包括其子接口BeanDefinitionRegistryPostProcessor)、BeanPostProcessor的实体bean已经创建并初始化完成
2.BeanFactoryPostProcessor(包括其子接口BeanDefinitionRegistryPostProcessor)的接口方法已经完成
3.自定义的bean已经扫描完成, 创建了对应的BeanDefinition对象
/**
 * Finish the initialization of this context's bean factory,
 * initializing all remaining singleton beans.
 * 翻译: 完成beanFactory的初始化, 初始化所有剩余的单例bean, 比如我们注册的student。
 */
protected void finishBeanFactoryInitialization(ConfigurableListableBeanFactory beanFactory) {
    // Initialize conversion service for this context.
    // 翻译: 初始化conversion service
    // 1.这里会跳过
    if (beanFactory.containsBean(CONVERSION_SERVICE_BEAN_NAME) &&
        beanFactory.isTypeMatch(CONVERSION_SERVICE_BEAN_NAME, ConversionService.class)) {
        beanFactory.setConversionService(
            beanFactory.getBean(CONVERSION_SERVICE_BEAN_NAME, ConversionService.class));
    }

    // Register a default embedded value resolver if no bean post-processor
    // (such as a PropertyPlaceholderConfigurer bean) registered any before:
    // at this point, primarily for resolution in annotation attribute values.
    // 2.这里暂略
    if (!beanFactory.hasEmbeddedValueResolver()) {
        beanFactory.addEmbeddedValueResolver(strVal -> getEnvironment().resolvePlaceholders(strVal));
    }

    // Initialize LoadTimeWeaverAware beans early to allow for registering their transformers early.
    // 3.跳过
    String[] weaverAwareNames = beanFactory.getBeanNamesForType(LoadTimeWeaverAware.class, false, false);
    for (String weaverAwareName : weaverAwareNames) {
        getBean(weaverAwareName);
    }

    // Stop using the temporary ClassLoader for type matching.
    // 4.跳过
    beanFactory.setTempClassLoader(null);

    // Allow for caching all bean definition metadata, not expecting further changes.
    // 5.跳过
    beanFactory.freezeConfiguration();

    // Instantiate all remaining (non-lazy-init) singletons.
    // 6.初始化剩余的所有的非lazy的bean, 具体解析见@11.1
    beanFactory.preInstantiateSingletons();
}
11.1 DefaultListableBeanFactory#preInstantiateSingletons()
public void preInstantiateSingletons() throws BeansException {
    if (logger.isTraceEnabled()) {
        logger.trace("Pre-instantiating singletons in " + this);
    }
    List<String> beanNames = new ArrayList<>(this.beanDefinitionNames);

    // Trigger initialization of all non-lazy singleton beans...
    // 触发所有非lazy的单例bean的初始化
    // 这里我们的BeanDefinition一共有7个: 5个内置的, 还有一个mainConfig增强的, 一个student
    for (String beanName : beanNames) {
        // 1.获取beanDefinition
        RootBeanDefinition bd = getMergedLocalBeanDefinition(beanName);
        // 2.当BeanDefinition对应的Bean满足:非抽象的、单例的、非lazy三个条件时, 执行下面
        if (!bd.isAbstract() && bd.isSingleton() && !bd.isLazyInit()) {
            // 3.判断Bean是不是FactoryBean, 即是否实现FactoryBean接口
            if (isFactoryBean(beanName)) {
                // 4.实现了BeanFactory
                Object bean = getBean(FACTORY_BEAN_PREFIX + beanName);
                if (bean instanceof FactoryBean) {
                    final FactoryBean<?> factory = (FactoryBean<?>) bean;
                    boolean isEagerInit;
                    if (System.getSecurityManager() != null && factory instanceof SmartFactoryBean) {
                        isEagerInit = AccessController.doPrivileged((PrivilegedAction<Boolean>)
                                                                    ((SmartFactoryBean<?>) factory)::isEagerInit,
                                                                    getAccessControlContext());
                    }
                    else {
                        isEagerInit = (factory instanceof SmartFactoryBean &&
                                       ((SmartFactoryBean<?>) factory).isEagerInit());
                    }
                    if (isEagerInit) {
                        getBean(beanName);
                    }
                }
            }
            else {
                // 5.未实现BeanFactory的普通Bean 见@11.2,内部调用的就是doGetBean()方法
                // 完成bean的创建和初始化, 并将创建好的bean放入到一级缓存中
                getBean(beanName);
            }
        }
    }

    // 6.判断bean有没有实现SmartInitializingSingleton接口, 如果实现了, 调用它们的afterSingletonsInstantiated()方法
    for (String beanName : beanNames) {
        Object singletonInstance = getSingleton(beanName);
        if (singletonInstance instanceof SmartInitializingSingleton) {
            final SmartInitializingSingleton smartSingleton = (SmartInitializingSingleton) singletonInstance;
            if (System.getSecurityManager() != null) {
                AccessController.doPrivileged((PrivilegedAction<Object>) () -> {
                    smartSingleton.afterSingletonsInstantiated();
                    return null;
                }, getAccessControlContext());
            }
            else {
                smartSingleton.afterSingletonsInstantiated();
            }
        }
    }
}
总结【注意:这里只讨论一般情况:非Lazy的,singleton的,非FactoryBean的,以下总结也是一样】
1.遍历BeanDefinition
2.调用getBean(beanName)方法, 根据name获取bean --> 这个方法尤其重要, 内部调用doGetBean(beanName, null, null, null)方法
	对于已经初始化完成的bean, 从beanFactory的一级缓存中直接取出; 对于未实例化的bean, 会完成bean的整个生命周期(实例化、初始化等), 并放入到一级缓存中
3.判断bean有没有实现SmartInitializingSingleton接口, 如果实现了, 调用它们的afterSingletonsInstantiated()方法
11.2 AbstractBeanFactory#deGetBean【重点方法】
这个方法是创建实体Bean的方法
/**
 * Return an instance, which may be shared or independent, of the specified bean.
 * @param name the name of the bean to retrieve //实例name
 * @param requiredType the required type of the bean to retrieve //要校验bean的类型
 * @param args arguments to use when creating a bean instance using explicit arguments
 * (only applied when creating a new instance as opposed to retrieving an existing one)
 * @param typeCheckOnly whether the instance is obtained for a type check,
 * not for actual use
 * @return an instance of the bean
 * @throws BeansException if the bean could not be created
 */
@SuppressWarnings("unchecked")
protected <T> T doGetBean(final String name, @Nullable final Class<T> requiredType,
                          @Nullable final Object[] args, boolean typeCheckOnly) throws BeansException {

    final String beanName = transformedBeanName(name);
    Object bean;

    // 1.getSington(beanName)方法, 实际调用重载方法getSingleton(beanName, true)
    // 见@11.4 getSingleton(String beanName, boolean allowEarlyReference)方法解析
    // 【注意】: 内置的5个BeanDefinition已经实例化完成, 在一级缓存了, 但是MainConfig和Student都没有实例化
    Object sharedInstance = getSingleton(beanName);
    // 2.如果从一级、二级或者三级缓存中拿到数据了, 且args为null, 第一次获取肯定拿不到, 因为还没有开始实例化
    if (sharedInstance != null && args == null) {
        if (logger.isTraceEnabled()) {
            if (isSingletonCurrentlyInCreation(beanName)) {
                logger.trace("Returning eagerly cached instance of singleton bean '" + beanName +
                             "' that is not fully initialized yet - a consequence of a circular reference");
            }
            else {
                logger.trace("Returning cached instance of singleton bean '" + beanName + "'");
            }
        }
        // 3.对于从一级缓存中取出来的bean, 且不是FactoryBean, 则直接返回
        bean = getObjectForBeanInstance(sharedInstance, name, beanName, null);
    }
	// 4.如果一级二级三级缓存中都没有
    else {
        // 5.是否在原型模式的创建中, 如果是, 抛出异常
        if (isPrototypeCurrentlyInCreation(beanName)) {
            throw new BeanCurrentlyInCreationException(beanName);
        }

        // 6.父beanFactory为空, 这里跳过
        BeanFactory parentBeanFactory = getParentBeanFactory();
        if (parentBeanFactory != null && !containsBeanDefinition(beanName)) {
            // Not found -> check parent.
            String nameToLookup = originalBeanName(name);
            if (parentBeanFactory instanceof AbstractBeanFactory) {
                return ((AbstractBeanFactory) parentBeanFactory).doGetBean(
                    nameToLookup, requiredType, args, typeCheckOnly);
            }
            else if (args != null) {
                // Delegation to parent with explicit args.
                return (T) parentBeanFactory.getBean(nameToLookup, args);
            }
            else if (requiredType != null) {
                // No args -> delegate to standard getBean method.
                return parentBeanFactory.getBean(nameToLookup, requiredType);
            }
            else {
                return (T) parentBeanFactory.getBean(nameToLookup);
            }
        }
	    // 7.当前bean是否只是做类型校验, 一般都不是, 进入
        if (!typeCheckOnly) {
            // 8.标记当前bean为已经创建的bean
            markBeanAsCreated(beanName);
        }

        try {
            // 9.mainConfig之前对应的是AnnotationGenericBeanDefinition, 现在把它封装成RootDefinition, 存放到mergedBeanDefinitions中
            //【注意:】上面的markBeanAsCreated(beanName)方法会将RootDefinition从mergedBeanDefinitions中移除,然后这里又添加回来了, why
            final RootBeanDefinition mbd = getMergedLocalBeanDefinition(beanName);
            // 10.校验RootBeanDefinition对应的Class不是抽象的
            checkMergedBeanDefinition(mbd, beanName, args);

            // 11. 获取当前Bean @DependsOn的Bean, mainConfig没有, 这里跳过
            String[] dependsOn = mbd.getDependsOn();
            if (dependsOn != null) {
                for (String dep : dependsOn) {
                    if (isDependent(beanName, dep)) {
                        throw new BeanCreationException(mbd.getResourceDescription(), beanName,
 "Circular depends-on relationship between '" + beanName + "' and '" + dep + "'");
                    }
                    registerDependentBean(dep, beanName);
                    try {
                        getBean(dep);
                    }
                    catch (NoSuchBeanDefinitionException ex) {
                        throw new BeanCreationException(mbd.getResourceDescription(), beanName,
 "'" + beanName + "' depends on missing bean '" + dep + "'", ex);
                    }
                }
            }

            // 12.创建实体Bean
            // 创建scope==singleton的bean, 默认是singleton
            if (mbd.isSingleton()) {
                // 13.调用getSingleton方法, 将创建的bean放入到一级缓存中, 并且从二级和三级缓存中移除, 见@11.3
                sharedInstance = getSingleton(beanName, () -> {
                    try {
                        // 14.创建Bean, 见@11.5 方法
                        return createBean(beanName, mbd, args);
                    }
                    catch (BeansException ex) {
                        // Explicitly remove instance from singleton cache: It might have been put there
                        // eagerly by the creation process, to allow for circular reference resolution.
                        // Also remove any beans that received a temporary reference to the bean.
                        destroySingleton(beanName);
                        throw ex;
                    }
                });
                bean = getObjectForBeanInstance(sharedInstance, name, beanName, mbd);
            }
		   // 创建scope==protoType的bean
            else if (mbd.isPrototype()) {
                // It's a prototype -> create a new instance.
                Object prototypeInstance = null;
                try {
                    beforePrototypeCreation(beanName);
                    prototypeInstance = createBean(beanName, mbd, args);
                }
                finally {
                    afterPrototypeCreation(beanName);
                }
                bean = getObjectForBeanInstance(prototypeInstance, name, beanName, mbd);
            }
		    // 创建非singleton和protoType的bean
            else {
                String scopeName = mbd.getScope();
                final Scope scope = this.scopes.get(scopeName);
                if (scope == null) {
                    throw new IllegalStateException("No Scope registered for scope name '" + scopeName + "'");
                }
                try {
                    Object scopedInstance = scope.get(beanName, () -> {
                        beforePrototypeCreation(beanName);
                        try {
                            return createBean(beanName, mbd, args);
                        }
                        finally {
                            afterPrototypeCreation(beanName);
                        }
                    });
                    bean = getObjectForBeanInstance(scopedInstance, name, beanName, mbd);
                }
                catch (IllegalStateException ex) {
                    throw new BeanCreationException(beanName, "Scope '" + scopeName + "' is not active for the current thread; consider " + "defining a scoped proxy for this bean if you intend to refer to it from a singleton", ex);
                }
            }
        }
        catch (BeansException ex) {
            cleanupAfterBeanCreationFailure(beanName);
            throw ex;
        }
    }

    // Check if required type matches the type of the actual bean instance.
    // 如果参数中传了Bean的类型, 则进行校验和强制转换
    if (requiredType != null && !requiredType.isInstance(bean)) {
        try {
            T convertedBean = getTypeConverter().convertIfNecessary(bean, requiredType);
            if (convertedBean == null) {
                throw new BeanNotOfRequiredTypeException(name, requiredType, bean.getClass());
            }
            return convertedBean;
        }
        catch (TypeMismatchException ex) {
            if (logger.isTraceEnabled()) {
                logger.trace("Failed to convert bean '" + name + "' to required type '" +
                             ClassUtils.getQualifiedName(requiredType) + "'", ex);
            }
            throw new BeanNotOfRequiredTypeException(name, requiredType, bean.getClass());
        }
    }
    return (T) bean;
}
总结
1.先从beanFactory的一级缓存获取一次, 从一级缓存中取出来的bean, 一开始一般取不出来
2.判断是否在原型模式创建中, 如果是, 则抛出循环依赖异常 -- 原型模式不支持循环依赖
3.获取当前beanFactory的父类beanFactory, 一般为空
4.把当前beanName存储到alreadyCreated已创建集合中
5.将当前beanName对应的bd存放到 mergedBeanDefinitions中
6.解析@DependOn标签
7.调用 getSingleton(String beanName, ObjectFactory<?> singletonFactory) 方法, 完成bean的生命周期, 并放入到一级缓存中
8.如果传了ClassType, 则需要校验
11.3 DefaultSingletonBeanRegistry#getSingleton(String beanName, ObjectFactory<?> singletonFactory)
/**
 * Return the (raw) singleton object registered under the given name,
 * creating and registering a new one if none registered yet.
 * @param beanName the name of the bean
 * @param singletonFactory the ObjectFactory to lazily create the singleton
 * with, if necessary
 * @return the registered singleton object
 */
public Object getSingleton(String beanName, ObjectFactory<?> singletonFactory) {
    Assert.notNull(beanName, "Bean name must not be null");
    synchronized (this.singletonObjects) {
        // 1.先从一级缓存中拿
        Object singletonObject = this.singletonObjects.get(beanName);
        if (singletonObject == null) {
            // 2.如果当前bean在销毁过程中, 则抛出异常
            if (this.singletonsCurrentlyInDestruction) {
                throw new BeanCreationNotAllowedException(beanName, "Singleton bean creation not allowed while singletons of this factory are in destruction " + "(Do not request a bean from a BeanFactory in a destroy method implementation!)");
            }
            if (logger.isDebugEnabled()) {
                logger.debug("Creating shared instance of singleton bean '" + beanName + "'");
            }
            // 3.创建前准备工作
            // 添加到 singletonsCurrentlyInCreation 【在创建过程中的单例集合】
            beforeSingletonCreation(beanName);
            boolean newSingleton = false;
            boolean recordSuppressedExceptions = (this.suppressedExceptions == null);
            if (recordSuppressedExceptions) {
                this.suppressedExceptions = new LinkedHashSet<>();
            }
            try {
                // 4.这里调用的是createBean()方法, 见@11.5, 这个方法中完成bean的生命周期
                singletonObject = singletonFactory.getObject();
                newSingleton = true;
            }
            catch (IllegalStateException ex) {
                // Has the singleton object implicitly appeared in the meantime ->
                // if yes, proceed with it since the exception indicates that state.
                singletonObject = this.singletonObjects.get(beanName);
                if (singletonObject == null) {
                    throw ex;
                }
            }
            catch (BeanCreationException ex) {
                if (recordSuppressedExceptions) {
                    for (Exception suppressedException : this.suppressedExceptions) {
                        ex.addRelatedCause(suppressedException);
                    }
                }
                throw ex;
            }
            finally {
                if (recordSuppressedExceptions) {
                    this.suppressedExceptions = null;
                }
                // 5.bean的生命周期完成后, 从singletonsCurrentlyInCreation移除 【在创建过程中的单例集合】, 根创建前的准备工作对应
                afterSingletonCreation(beanName);
            }
            // 6.如果是新创建的bean, 放入到一级缓存中, 从二级缓存和三级缓存中移除
            if (newSingleton) {
                addSingleton(beanName, singletonObject);
            }
        }
        return singletonObject;
    }
}
总结
1.一开始还是会先从一级缓存中取, 如果取出来不为空则直接返回
2.一级缓存中没有, 则先把当前beanName添加到 singletonsCurrentlyInCreation 【在创建过程中的单例集合】, 然后调用createBean()完成bean的生命周期, 完成后, 从singletonsCurrentlyInCreation中移除
3.把完成生命周期的bean放入到一级缓存中, 同时从二级缓存和三级缓存中移除
11.4 getSingleton(String beanName, boolean allowEarlyReference)
/**
 * Return the (raw) singleton object registered under the given name.
 * <p>Checks already instantiated singletons and also allows for an early
 * reference to a currently created singleton (resolving a circular reference).
 * @param beanName the name of the bean to look for
 * @param allowEarlyReference whether early references should be created or not
 * @return the registered singleton object, or {@code null} if none found
 */
@Nullable
protected Object getSingleton(String beanName, boolean allowEarlyReference) {
    // 1.先从一级缓存中拿, 一级缓存中存放的是实例化完成的bean
    Object singletonObject = this.singletonObjects.get(beanName);
    // 2.如果一级缓存中没有拿到, 且也不在创建过程中
    if (singletonObject == null && isSingletonCurrentlyInCreation(beanName)) {
        synchronized (this.singletonObjects) {
            // 3.从二级缓存中拿
            singletonObject = this.earlySingletonObjects.get(beanName);
            // 4.二级缓存中如果为空, 且允许早期引用, 则从三级缓存中拿
            if (singletonObject == null && allowEarlyReference) {
                ObjectFactory<?> singletonFactory = this.singletonFactories.get(beanName);
                // 5.三级缓存中如果有, 则从三级缓存中删除, 把自己放入到二级缓存中
                if (singletonFactory != null) {
                    singletonObject = singletonFactory.getObject();
                    this.earlySingletonObjects.put(beanName, singletonObject);
                    this.singletonFactories.remove(beanName);
                }
            }
        }
    }
    return singletonObject;
}
总结
getSington(beanName)方法, 就是从缓存中拿实体bean
先从一级缓存中拿, 拿到直接返回; 拿不到就从二级缓存中拿, 拿到直接返回; 拿不到就从三级缓存中拿, 拿到就使用三级缓存中存放的工厂对象创建对象, 然后把自己从三级缓存中移除, 把创建的对象放入到二级缓存, 并返回; 如果都没拿到, 返回null
11.5 AbstractAutowireCapableBeanFactory#createBean()
/**
 * Central method of this class: creates a bean instance,
 * populates the bean instance, applies post-processors, etc.
 * @see #doCreateBean
 * 翻译: 核心方法: 创建bean, 初始化bean, 应用BeanPostProcessors后置处理器
 */
@Override
protected Object createBean(String beanName, RootBeanDefinition mbd, @Nullable Object[] args)
    throws BeanCreationException {

    if (logger.isTraceEnabled()) {
        logger.trace("Creating instance of bean '" + beanName + "'");
    }
    RootBeanDefinition mbdToUse = mbd;

    // 1.获取当前BeanDefinition对应的Class对象
    // 我们的mainConfig对应的Class是增强后的MainClass, 即com.tca.spring.framework.learning.ioc.config.MainConfig$$EnhancerBySpringCGLIB$$e2c0a82
    Class<?> resolvedClass = resolveBeanClass(mbd, beanName);
    // 2.对于mainConfig, 这里跳过
    if (resolvedClass != null && !mbd.hasBeanClass() && mbd.getBeanClassName() != null) {
        mbdToUse = new RootBeanDefinition(mbd);
        mbdToUse.setBeanClass(resolvedClass);
    }

    // 3.准备override的方法, 这里没有, 跳过
    try {
        mbdToUse.prepareMethodOverrides();
    }
    catch (BeanDefinitionValidationException ex) {
        throw new BeanDefinitionStoreException(mbdToUse.getResourceDescription(), beanName, "Validation of method overrides failed", ex);
    }

    try {
        // Give BeanPostProcessors a chance to return a proxy instead of the target bean instance.
        // 4.重点: 这里让【实现了InstantiationAwareBeanPostProcessor】的BeanPostProcessor来生成bean的代理对象
        // 【这里是第一处使用到特殊BeanPostProcessor的地方】
        // resolveBeforeInstantiation方法解析:
        // 判断当前bean不是spring内置bean且容器中有InstantiationAwareBeanPostProcessor的实现类:
        // 依次执行postProcessBeforeInstantiation方法, 返回的结果【代理对象】不为空时, 直接跳出循环, 这里我们就知道为什么前面的BeanPostProcessor需要分PriorityOrdered/Ordered/普通的 并排序了, 优先级高的, 如果执行完了, 生成代理对象了, 优先级低的就无法执行了
        // 当生成了代理对象之后, 就要依次执行所有BeanPostProcessor的postProcessAfterInitialization方法【注意: 当其中某一个方法执行的结果为null时, 此时后面的BeanPostProcessors也无法执行了, 此时返回上一个BeanPostProcessor的处理结果】
        // 这里我们内置的InstantiationAwareBeanPostProcessor一共有3个, 这3个的postProcessBeforeInstantiation()方法都是空实现: ImportAwareBeanPostProcessor、CommonAnnotationBeanPostProcessor、AutowireAnnotationBeanPostProcessor
        Object bean = resolveBeforeInstantiation(beanName, mbdToUse);
        if (bean != null) {
            return bean;
        }
    }
    catch (Throwable ex) {
        throw new BeanCreationException(mbdToUse.getResourceDescription(), beanName, "BeanPostProcessor before instantiation of bean failed", ex);
    }

    try {
        // 5.如果上面没有InstantiationAwareBeanPostProcessor生成的代理对象, 则进入到doCreateBean方法, 创建普通的bean对象
        // 具体见@11.6, 完成bean的创建和初始化【bean的生命周期】
        Object beanInstance = doCreateBean(beanName, mbdToUse, args);
        if (logger.isTraceEnabled()) {
            logger.trace("Finished creating instance of bean '" + beanName + "'");
        }
        return beanInstance;
    }
    catch (BeanCreationException | ImplicitlyAppearedSingletonException ex) {
        // A previously detected exception with proper bean creation context already,
        // or illegal singleton state to be communicated up to DefaultSingletonBeanRegistry.
        throw ex;
    }
    catch (Throwable ex) {
        throw new BeanCreationException(
            mbdToUse.getResourceDescription(), beanName, "Unexpected exception during bean creation", ex);
    }
}
总结
1.这里让【实现了InstantiationAwareBeanPostProcessor】的BeanPostProcessor来生成bean的代理对象, 如果有生成, 则直接返回【这是第一次使用BeanPostProcessor】
2.如果上面没有生成, 则调用 doCreateBean(beanName, mbdToUse, args) 方法完成bean的生命周期
11.6 AbstractAutowireCapableBeanFactory#doCreateBean()【完成bean的生命周期】
/**
 * Actually create the specified bean. Pre-creation processing has already happened
 * at this point, e.g. checking {@code postProcessBeforeInstantiation} callbacks.
 * <p>Differentiates between default bean instantiation, use of a
 * factory method, and autowiring a constructor.
 * 翻译:
 * @param beanName the name of the bean
 * @param mbd the merged bean definition for the bean
 * @param args explicit arguments to use for constructor or factory method invocation
 * @return a new instance of the bean
 * @throws BeanCreationException if the bean could not be created
 * @see #instantiateBean
 * @see #instantiateUsingFactoryMethod
 * @see #autowireConstructor
 */
protected Object doCreateBean(final String beanName, final RootBeanDefinition mbd, final @Nullable Object[] args)
    throws BeanCreationException {

    BeanWrapper instanceWrapper = null;
    // 1.判断是否是单例 mainConfig是
    if (mbd.isSingleton()) {
        // 2.这里 factoryBeanInstanceCache 是空的, 所以instanceWrapper==null
        instanceWrapper = this.factoryBeanInstanceCache.remove(beanName);
    }
    // 3.进入
    if (instanceWrapper == null) {
        // 4.【重点方法:】真正的创建对象的方法, 见@11.7
        // 【注意:】这里仅仅是实例化完成, 即使用反射创建出对象本身, 但是并没有初始化完成
        instanceWrapper = createBeanInstance(beanName, mbd, args);
    }
    // 5.创建的对象和对象的Class类型
    final Object bean = instanceWrapper.getWrappedInstance();
    Class<?> beanType = instanceWrapper.getWrappedClass();
    if (beanType != NullBean.class) {
        mbd.resolvedTargetType = beanType;
    }

    synchronized (mbd.postProcessingLock) {
        if (!mbd.postProcessed) {
            try {
                // 6.【注意:】这里会第三次使用到BeanPostProcessor, 这里用的是MergedBeanDefinitionPostProcessor
                // applyMergedBeanDefinitionPostProcessors() 执行过程:
    		   // 拿到所有的MergedBeanDefinitionPostProcessor【已经排序过】, 依次调用它们的postProcessMergedBeanDefinition()方法
                // 这里的MergedBeanDefinitionPostProcessor【排序后】依次是:
                // CommonAnnotationBeanPostProcessor
                // AutowiredAnnotationBeanPostProcessor
                // ApplicationListenerDetector
                applyMergedBeanDefinitionPostProcessors(mbd, beanType, beanName);
            }
            catch (Throwable ex) {
                throw new BeanCreationException(mbd.getResourceDescription(), beanName, "Post-processing of merged bean definition failed", ex);
            }
            mbd.postProcessed = true;
        }
    }

    // 7.是否支持循环依赖
    boolean earlySingletonExposure = (mbd.isSingleton() && this.allowCircularReferences &&
                                      isSingletonCurrentlyInCreation(beanName));

    if (earlySingletonExposure) {
        if (logger.isTraceEnabled()) {
            logger.trace("Eagerly caching bean '" + beanName + "' to allow for resolving potential circular references");
        }
        // 8.如果支持循环依赖, 创建对象对应的ObjectFactory对象, 放入到三级缓存中:
        // private final Map<String, ObjectFactory<?>> singletonFactories = new HashMap<>(16)
        // 当调用 () -> getEarlyBeanReference(beanName, mbd, bean) 时, 会第四次使用到BeanPostProcessor【SmartInstantiationAwareBeanPostProcessor】
        addSingletonFactory(beanName, () -> getEarlyBeanReference(beanName, mbd, bean));
    }

    Object exposedObject = bean;
    try {
        // 9.给对象属性赋值【上面仅仅是创建了对象, 但是没有初始化, 即属性字段都没有赋值】, 见@11.8
        // 这里会第五次第六次使用BeanPostProcessor 【InstantiationAwareBeanPostProcessor】,判断是否需要属性注入, 并完成注入
        populateBean(beanName, mbd, instanceWrapper);
        // 10.初始化对象, 依次调用BeanPostProcessor的postProcessBeforeInitialization方法, bean配置初始化方法, BeanPostProcessor的postProcessAfterInitialization方法
        // 这里会第七次第八次使用BeanPostProcessor
        exposedObject = initializeBean(beanName, exposedObject, mbd);
    }
    catch (Throwable ex) {
        if (ex instanceof BeanCreationException && beanName.equals(((BeanCreationException) ex).getBeanName())) {
            throw (BeanCreationException) ex;
        }
        else {
            throw new BeanCreationException(
                mbd.getResourceDescription(), beanName, "Initialization of bean failed", ex);
        }
    }
    // 11.是否支持循环依赖, 默认是
    if (earlySingletonExposure) {
        // 12.这时候bean只在三级缓存中, 第二个参数为false时, 取出来的earlySingletonReference == null
        Object earlySingletonReference = getSingleton(beanName, false);
        if (earlySingletonReference != null) {
            if (exposedObject == bean) {
                exposedObject = earlySingletonReference;
            }
            else if (!this.allowRawInjectionDespiteWrapping && hasDependentBean(beanName)) {
                String[] dependentBeans = getDependentBeans(beanName);
                Set<String> actualDependentBeans = new LinkedHashSet<>(dependentBeans.length);
                for (String dependentBean : dependentBeans) {
                    if (!removeSingletonIfCreatedForTypeCheckOnly(dependentBean)) {
                        actualDependentBeans.add(dependentBean);
                    }
                }
                if (!actualDependentBeans.isEmpty()) {
                    throw new BeanCurrentlyInCreationException(beanName, "Bean with name '" + beanName + "' has been injected into other beans [" + StringUtils.collectionToCommaDelimitedString(actualDependentBeans) +
 "] in its raw version as part of a circular reference, but has eventually been " + "wrapped. This means that said other beans do not use the final version of the " + "bean. This is often the result of over-eager type matching - consider using " + "'getBeanNamesOfType' with the 'allowEagerInit' flag turned off, for example.");
                }
            }
        }
    }

    // Register bean as disposable.
    try {
        // 13.这里会跳过
        registerDisposableBeanIfNecessary(beanName, bean, mbd);
    }
    catch (BeanDefinitionValidationException ex) {
        throw new BeanCreationException(
            mbd.getResourceDescription(), beanName, "Invalid destruction signature", ex);
    }

    return exposedObject;
}
总结
doCreateBean()这个方法是狭义上的完成bean的生命周期的方法:
1.创建对象: 使用反射的方式, 通过合适的构造器创建对象【对应的方法--createBeanInstance(beanName, mbd, args)】
-- 这里会第二次使用BeanPostProcessor【SmartInstantiationAwareBeanPostProcessor】用于推断使用特殊的构造器来反射创建bean实例
2.第三次调用BeanPostProcessor【MergedBeanDefinitionPostProcessor】, 具体作用以后再谈
3.如果支持循环依赖, 创建对应bean对应的ObjectFactory, 并将其放入到三级缓存中!!!用以解决循环依赖问题
-- 创建的ObjectFactory重新了getEarlyBeanReference()方法, 这个方法第四次使用BeanPostProcessor【SmartInstantiationAwareBeanPostProcessor】
4.属性注入: 注入bean的相关属性【对应的方法--populateBean(beanName, mbd, instanceWrapper)】
-- 这里会第五次和第六次使用BeanPostProcessor【InstantiationAwareBeanPostProcessor】, 判断是否需要属性注入, 并完成注入
5.对象的初始化操作: 先后调用@PostConstruct配置的方法, 如果实现InitailizingBean接口, 重写afterPropertiesSet()方法, 调用@Bean(initMethod)配置的init-method方法【对应的方法--initializeBean(beanName, exposedObject, mbd)中调用的invokeAwareMethods(beanName, bean)方法】
-- 这里会第七次使用BeanPostProcessor
6.aop的实现: 【对应的方法--initializeBean(beanName, exposedObject, mbd)中调用的applyBeanPostProcessorsAfterInitialization方法】
-- 这里会第八次使用BeanPostProcessor【这里是狭义上AOP的实现】
7.放入beanFactory: 将完整的bean放入到一级缓存singletonObjects
11.7 AbstractAutowireCapableBeanFactory#createBeanInstance(String beanName, RootBeanDefinition mbd, @Nullable Object[] args)
/**
 * Create a new instance for the specified bean, using an appropriate instantiation strategy:
 * factory method, constructor autowiring, or simple instantiation.
 * 翻译: 使用适当的实例化策略为指定bean创建新实例:工厂方法、构造函数自动连接或简单实例化。
 * @param beanName the name of the bean
 * @param mbd the bean definition for the bean
 * @param args explicit arguments to use for constructor or factory method invocation
 * @return a BeanWrapper for the new instance
 * @see #obtainFromSupplier
 * @see #instantiateUsingFactoryMethod
 * @see #autowireConstructor
 * @see #instantiateBean
 */
protected BeanWrapper createBeanInstance(String beanName, RootBeanDefinition mbd, @Nullable Object[] args) {
    // 1.获取bean对应的Class
    Class<?> beanClass = resolveBeanClass(mbd, beanName);
    // 2.跳过
    if (beanClass != null && !Modifier.isPublic(beanClass.getModifiers()) && !mbd.isNonPublicAccessAllowed()) {
        throw new BeanCreationException(mbd.getResourceDescription(), beanName, "Bean class isn't public, and non-public access not allowed: " + beanClass.getName());
    }
    // 3.获取instanceSupplier, mainConfig为空, 下面跳过
    Supplier<?> instanceSupplier = mbd.getInstanceSupplier();
    if (instanceSupplier != null) {
        return obtainFromSupplier(instanceSupplier, beanName);
    }
    // 4.对于mainConfig, 这里跳过
    if (mbd.getFactoryMethodName() != null) {
        return instantiateUsingFactoryMethod(beanName, mbd, args);
    }

    boolean resolved = false;
    boolean autowireNecessary = false;
    if (args == null) {
        synchronized (mbd.constructorArgumentLock) {
            // 5.mainConfig, 这里跳过
            if (mbd.resolvedConstructorOrFactoryMethod != null) {
                resolved = true;
                autowireNecessary = mbd.constructorArgumentsResolved;
            }
        }
    }
    // 6.mainConfig, 这里跳过
    if (resolved) {
        if (autowireNecessary) {
            return autowireConstructor(beanName, mbd, null, null);
        }
        else {
            return instantiateBean(beanName, mbd);
        }
    }

    // 7.决定使用哪个构造器来反射创建对象
    // 【注意:】这里会第二次使用到BeanPostProcessor, 这里用的是SmartInstantiationAwareBeanPostProcessor
    // 【复习:】第一次使用BeanPostProcessor, 是在创建对象之前, 使用的是InstantiationAwareBeanPostProcessor, 这里使用的SmartInstantiationAwareBeanPostProcessor是 InstantiationAwareBeanPostProcessor 的子接口
    // determineConstructorsFromBeanPostProcessors() 执行过程:
    // 拿到所有的SmartInstantiationAwareBeanPostProcessor【已经排序过】, 依次调用它们的determineCandidateConstructors()方法, 执行结果如果不为空, 则直接返回, 剩下的SmartInstantiationAwareBeanPostProcessor就没有机会执行了
    // 这里的SmartInstantiationAwareBeanPostProcessor【排序后】依次是:
    // ImportAwareBeanPostProcessor: 它的determineCandidateConstructors方法返回bull;
    // AutowiredAnnotationBeanPostProcessor: 它的determineCandidateConstructors方法有具体实现, 但是对于mainConfig, 这里返回null
    Constructor<?>[] ctors = determineConstructorsFromBeanPostProcessors(beanClass, beanName);
    if (ctors != null || mbd.getResolvedAutowireMode() == AUTOWIRE_CONSTRUCTOR ||
        mbd.hasConstructorArgumentValues() || !ObjectUtils.isEmpty(args)) {
        return autowireConstructor(beanName, mbd, ctors, args);
    }

    // 8.继续查找合适的构造器
    ctors = mbd.getPreferredConstructors();
    if (ctors != null) {
        return autowireConstructor(beanName, mbd, ctors, null);
    }

    // 9.没有特殊的构造器的时候, 使用特殊的无参构造器方法
    // 【注意】这里使用反射创建出对象, 但是仅仅是创建出对象, 但是对象还没有初始化完成
    return instantiateBean(beanName, mbd);
}
总结
这个方法的主要作用:选择合适的构造器方法, 通过反射创建对应的对象
1.优先使用BeanPostProcessor获取最合适的构造器:获取所有的已排序的SmartInstantiationAwareBeanPostProcessor, 依次调用它们的determineCandidateConstructors, 获取构造器对象
2.其次选择BeanDefinition的preferedConstructor
3.以上都为空时, 使用默认的无参构造器生成对象
11.8 AbstractAutowireCapableBeanFactory#populateBean(String beanName, RootBeanDefinition mbd, @Nullable BeanWrapper bw)
/**
 * Populate the bean instance in the given BeanWrapper with the property values
 * from the bean definition.
 * 翻译: 注入bean的属性
 * @param beanName the name of the bean
 * @param mbd the bean definition for the bean
 * @param bw the BeanWrapper with bean instance
 */
@SuppressWarnings("deprecation")  // for postProcessPropertyValues
protected void populateBean(String beanName, RootBeanDefinition mbd, @Nullable BeanWrapper bw) {
    // 1.这里跳过
    if (bw == null) {
        if (mbd.hasPropertyValues()) {
            throw new BeanCreationException(
                mbd.getResourceDescription(), beanName, "Cannot apply property values to null instance");
        }
        else {
            // Skip property population phase for null instance.
            return;
        }
    }

    // Give any InstantiationAwareBeanPostProcessors the opportunity to modify the
    // state of the bean before properties are set. This can be used, for example,
    // to support styles of field injection.
    // 翻译: 在注入属性之前, 可以使用BeanPostProcessor修改bean的状态, 用来支持字段注入的不同方式
    boolean continueWithPropertyPopulation = true;
	// 2.这里是第五次使用BeanPostProcessor, 这里使用的是InstantiationAwareBeanPostProcessor
    // 依次拿到所有的InstantiationAwareBeanPostProcessor, 并执行它们的postProcessAfterInstantiation()方法, 这个方法的作用是:判断当前bean对象是否需要在创建完成之后进行属性注入, 如果需要, 返回true, 不需要, 则返回false;
    // spring内置的三个InstantiationAwareBeanPostProcessor都是返回true
    // ImportAwareBeanPostProcessor:
    // CommonAnnotationBeanPostProcessor:
    // AutowireAnnotationBeanPostProcessor:
    if (!mbd.isSynthetic() && hasInstantiationAwareBeanPostProcessors()) {
        for (BeanPostProcessor bp : getBeanPostProcessors()) {
            if (bp instanceof InstantiationAwareBeanPostProcessor) {
                InstantiationAwareBeanPostProcessor ibp = (InstantiationAwareBeanPostProcessor) bp;
                if (!ibp.postProcessAfterInstantiation(bw.getWrappedInstance(), beanName)) {
                    continueWithPropertyPopulation = false;
                    break;
                }
            }
        }
    }
	// 3.根据上面InstantiationAwareBeanPostProcessor的执行结果, 只要有一个返回的结果为不需要注入属性, 那么这里会直接终止方法执行
    if (!continueWithPropertyPopulation) {
        return;
    }
	// 4.对于mainConfig, 这里会跳过
    PropertyValues pvs = (mbd.hasPropertyValues() ? mbd.getPropertyValues() : null);
	// 5.对于mainConfig, 这里也会跳过mbd.getResolvedAutowireMode() == AUTOWIRE_NO
    if (mbd.getResolvedAutowireMode() == AUTOWIRE_BY_NAME || mbd.getResolvedAutowireMode() == AUTOWIRE_BY_TYPE) {
        MutablePropertyValues newPvs = new MutablePropertyValues(pvs);
        // Add property values based on autowire by name if applicable.
        if (mbd.getResolvedAutowireMode() == AUTOWIRE_BY_NAME) {
            autowireByName(beanName, mbd, bw, newPvs);
        }
        // Add property values based on autowire by type if applicable.
        if (mbd.getResolvedAutowireMode() == AUTOWIRE_BY_TYPE) {
            autowireByType(beanName, mbd, bw, newPvs);
        }
        pvs = newPvs;
    }
    // 6.这里为true, 即第五次使用的BeanPostProcessor
    boolean hasInstAwareBpps = hasInstantiationAwareBeanPostProcessors();
    // 7.这里为false
    boolean needsDepCheck = (mbd.getDependencyCheck() != AbstractBeanDefinition.DEPENDENCY_CHECK_NONE);

    PropertyDescriptor[] filteredPds = null;
    if (hasInstAwareBpps) {
        if (pvs == null) {
            pvs = mbd.getPropertyValues();
        }
        // 8.第六次使用BeanPostProcessor, 这次跟第五次使用的BeanPostProcessor一样,InstantiationAwareBeanPostProcessor,但是调用的方法不一样, 这一次调用的是postProcessProperties()方法
        // 【注意:】这里会完成属性注入
        // ImportAwareBeanPostProcessor:
    	// CommonAnnotationBeanPostProcessor:
    	// AutowireAnnotationBeanPostProcessor:
        for (BeanPostProcessor bp : getBeanPostProcessors()) {
            if (bp instanceof InstantiationAwareBeanPostProcessor) {
                InstantiationAwareBeanPostProcessor ibp = (InstantiationAwareBeanPostProcessor) bp;
                PropertyValues pvsToUse = ibp.postProcessProperties(pvs, bw.getWrappedInstance(), beanName);
                if (pvsToUse == null) {
                    if (filteredPds == null) {
                        filteredPds = filterPropertyDescriptorsForDependencyCheck(bw, mbd.allowCaching);
                    }
                    pvsToUse = ibp.postProcessPropertyValues(pvs, filteredPds, bw.getWrappedInstance(), beanName);
                    if (pvsToUse == null) {
                        return;
                    }
                }
                pvs = pvsToUse;
            }
        }
    }
    // 9.对于MainConfig, 下面跳过
    if (needsDepCheck) {
        if (filteredPds == null) {
            filteredPds = filterPropertyDescriptorsForDependencyCheck(bw, mbd.allowCaching);
        }
        checkDependencies(beanName, mbd, filteredPds, pvs);
    }

    if (pvs != null) {
        applyPropertyValues(beanName, mbd, bw, pvs);
    }
}
总结
这个方法的主要作用: 完成属性注入
1.在属性注入之前, 先使用BeanPostProcessor, 判断是否需要属性注入
2.判断是否是自动注入还是非自动注入, 如果是非自动注入, 则使用BeanPostProcessor完成属性注入
11.9 AbstractAutowireCapableBeanFactory#initializeBean(final String beanName, final Object bean, @Nullable RootBeanDefinition mbd)
/**
 * Initialize the given bean instance, applying factory callbacks
 * as well as init methods and bean post processors.
 * <p>Called from {@link #createBean} for traditionally defined beans,
 * and from {@link #initializeBean} for existing bean instances.
 * 翻译: 调用工厂回调、init方法、以及BeanPostProcessor, 进一步初始化对象
 * @param beanName the bean name in the factory (for debugging purposes)
 * @param bean the new bean instance we may need to initialize
 * @param mbd the bean definition that the bean was created with
 * (can also be {@code null}, if given an existing bean instance)
 * @return the initialized bean instance (potentially wrapped)
 * @see BeanNameAware
 * @see BeanClassLoaderAware
 * @see BeanFactoryAware
 * @see #applyBeanPostProcessorsBeforeInitialization
 * @see #invokeInitMethods
 * @see #applyBeanPostProcessorsAfterInitialization
 */
protected Object initializeBean(final String beanName, final Object bean, @Nullable RootBeanDefinition mbd) {
    if (System.getSecurityManager() != null) {
        AccessController.doPrivileged((PrivilegedAction<Object>) () -> {
            invokeAwareMethods(beanName, bean);
            return null;
        }, getAccessControlContext());
    }
    else {
        // 1.调用Aware接口回调方法
        invokeAwareMethods(beanName, bean);
    }

    Object wrappedBean = bean;
    if (mbd == null || !mbd.isSynthetic()) {
        // 2.【注意:】这里是第七次调用BeanPostProcessor
        // 获取所有的BeanPostProcessor, 调用它们的postProcessBeforeInitialization
        wrappedBean = applyBeanPostProcessorsBeforeInitialization(wrappedBean, beanName);
    }

    try {
        // 3.【注意:】这里spring的bean的初始化方法有多种实现方式:
        // 第一种: 实现InitailizingBean接口, 重写afterPropertiesSet()方法
        // 第二种: 使用@Bean(initMethod)配置的方法
        // 第三种: 使用@PostConstruct配置的方法
        // 以上三种方式可以同时存在, 调用顺序依次是:第三种、第一种、第二种
        invokeInitMethods(beanName, wrappedBean, mbd);
    }
    catch (Throwable ex) {
        throw new BeanCreationException(
            (mbd != null ? mbd.getResourceDescription() : null),
            beanName, "Invocation of init method failed", ex);
    }
    if (mbd == null || !mbd.isSynthetic()) {
        // 4.【注意:】这里是第八次调用BeanPostProcessor
        // 获取所有的BeanPostProcessor, 调用它们的postProcessAfterInitialization
        // 【注意:】这里是真正实现aop原理的地方
        wrappedBean = applyBeanPostProcessorsAfterInitialization(wrappedBean, beanName);
    }

    return wrappedBean;
}
总结
这个方法的主要作用: 在属性注入完成后, 完成生命周期的其他初始化
1.调用部分Aware接口
2.调用@PostConstruct配置的方法
3.如果实现InitailizingBean接口, 调用重写的afterPropertiesSet()方法
4.调用@Bean(initMethod)配置的方法
5.使用BeanPostProcessor完成AOP
问题解答:
1.我们自定义的BeanPostProcessor, postProcessBeforeInitialization()方法、postProcessAfterInitialization()方法什么时候执行?
1.由前面我们知道, 自定义的BeanPostProcessor的bean对象是在@6 步骤创建并初始化完成的;
2.它们的postProcessBeforeInitialization()方法、postProcessAfterInitialization()方法会在创建普通bean对象时, 在普通bean对象实例化完成后, 生命周期初始化方法调用完成之后, 调用, 进行AOP, 针对于每一个普通bean
BeanPostProcessor总结【非常重要】
1.第一次: 在创建bean之前, 使用【实现了InstantiationAwareBeanPostProcessor】的BeanPostProcessor来生成bean的代理对象, 如果有生成, 则直接返回
2.第二次: 如果第一次使用的过程中没有生成代理对象, 在实例化bean对象时, 使用BeanPostProcessor【SmartInstantiationAwareBeanPostProcessor】用于推断使用特殊的构造器来反射创建bean实例
3.第三次: 在实例化bean对象之后, 调用BeanPostProcessor【MergedBeanDefinitionPostProcessor】, 具体作用以后再谈
4.第四次: 如果支持循环依赖, 创建对应bean对应的ObjectFactory, 并将其放入到三级缓存中!!!用以解决循环依赖问题, 创建的ObjectFactory第四次使用BeanPostProcessor【SmartInstantiationAwareBeanPostProcessor】
5.第五、六次: 实例化完成后, 注入bean的相关属性时, 这里会第五次和第六次使用BeanPostProcessor【InstantiationAwareBeanPostProcessor】, 判断是否需要属性注入, 并完成注入
6.第七、八次: 在属性注入之后, 执行初始化方法前后, 会先后调用BeanPostProcessor, 完成AOP

以上, 在实例化bean之前, 第一次使用bdp, 生成代理对象; 如果代理对象没有生成, 在普通bean实例化时, 第二次使用bdp进行构造器推断, 实例化后第三次、第四次使用dbp, 属性注入时第五次、第六次使用bdp, 在初始化方法前后完成第七次、第八次使用bdp
12.finishRefresh()
/**
 * Finish the refresh of this context, invoking the LifecycleProcessor's
 * onRefresh() method and publishing the
 * {@link org.springframework.context.event.ContextRefreshedEvent}.
 */
// 翻译: 调用LifecycleProcessor的 onRefresh() 方法并发布ContextRefreshedEvent事件
protected void finishRefresh() {
    // Clear context-level resource caches (such as ASM metadata from scanning).
    // 翻译: 清除上下文级别的资源缓存(例如来自扫描的ASM元数据)。
    clearResourceCaches();

    // Initialize lifecycle processor for this context.
    initLifecycleProcessor();

    // Propagate refresh to lifecycle processor first.
    getLifecycleProcessor().onRefresh();

    // Publish the final event.
    publishEvent(new ContextRefreshedEvent(this));

    // Participate in LiveBeansView MBean, if active.
    LiveBeansView.registerApplicationContext(this);
}
评论